


In this guide, we’ll walk through a complete “all keys lost” procedure on a 2017 VW Polo equipped with the MQB system, using two professional tools: the OBDStar X300 Classic G3 and the Yanhua Mini ACDP with the MQB Module.
Vehicle Overview
Model: 2017 VW Polo
System: MQB
Transmission: Automatic (DQ200 gearbox)
Key Type: Bladed key (non-proximity)
ECU Type: Bosch MED7.5.25
*This procedure applies to many MQB-platform VWs and Audis with similar setups. Always ensure you have the latest software updates on both devices and work methodically.
Tools Required
OBDStar X300 Classic G3 with ECU license
Yanhua ACDP with MQB Module 33/Module 34 (RH850/V850)
MP001 and P004 adapters
OBDSTAR 5 in 1 ECM-001 solder free cable
Yanhua ACDP MQB79 interface board
External power supply
Soldering equipment (optional, if not using ACDP)
Aftermarket or original key to be programmed
The benefit of this bundle (OBDSTAR G3+ Yanhua ACDP)=
- Yanhua ACDP offers a solder-free read for the instrument cluster, saving time and reducing risk.
- OBDStar G3 handles ECU and transmission reads, sync code calculation, dealer key generation, and key learning.
Main procedure:
1. Decode key lock
2. Remove necessary modules
3. Read ECU module data
4. Read cluster immo data
5. Read gearbox TCU data
6. Calculate sync data
7. Make dealer key
8. Learn key
Step-by-Step Guide
Step 1: Physical Key Preparation
Before any electronic work begins, the lock must be picked and decoded to cut a new key blade. This allows the ignition to turn, which is essential for the programming process.
Time estimate: ~15 minutes
Step 2: Remove Necessary Modules
Because this is an MQB system with an automatic transmission, three modules must be read:
- Instrument Cluster (dashboard)
- ECU (Engine Control Unit)
- TCM (Transmission Control Module – DQ200)
NOTE: If it is a smart key, an additional ELV CS code is required.
Accessing the Modules:
- Instrument Cluster: Two screws and one connector. Remove the rear cover to access the microprocessor.
- ECU: Located near the engine bay area. Easily accessible with minimal disassembly.
- Transmission Module: Accessible after removing the air pipe. No major components need to be removed.
Time estimate: 5–15 minutes per module.
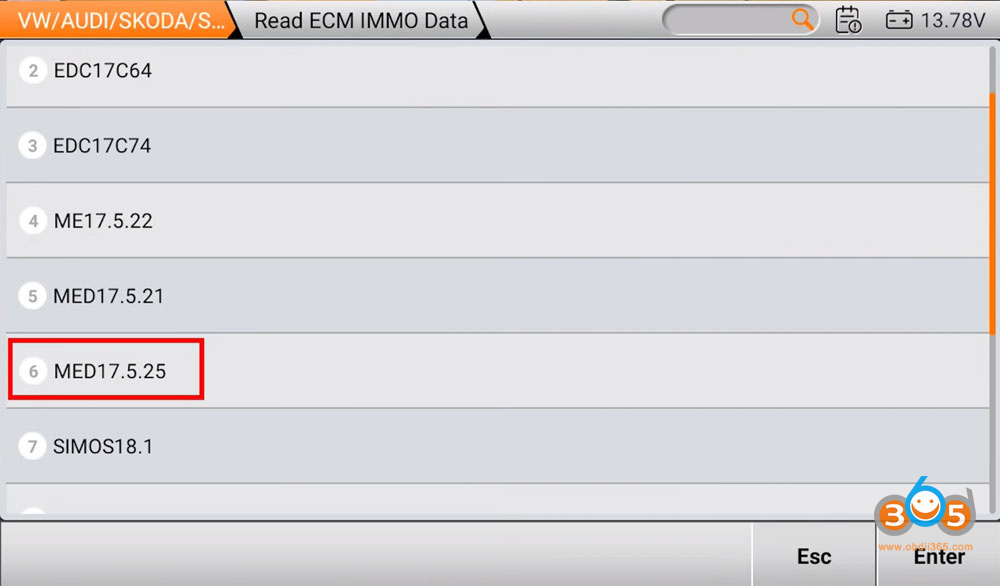
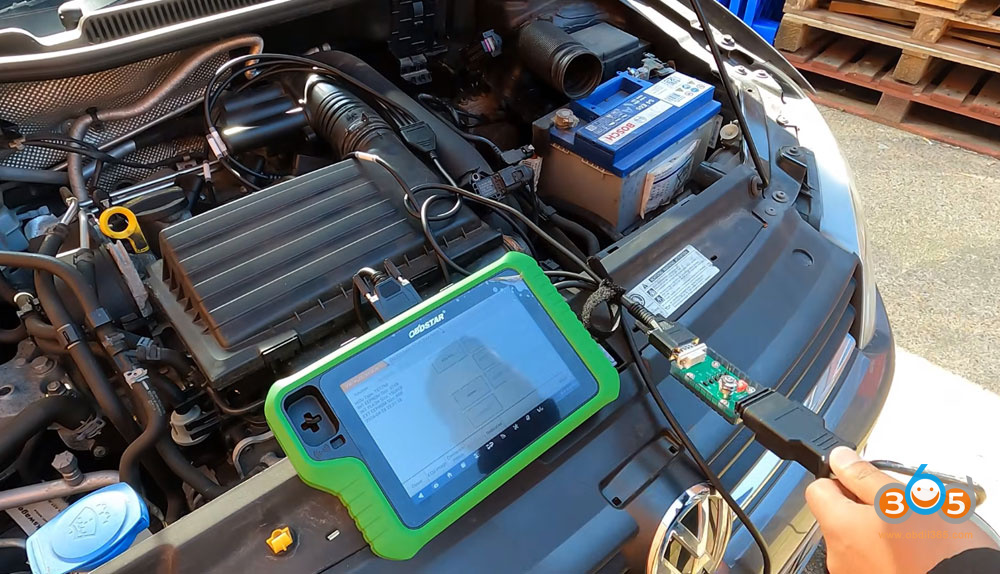
Step 3: Read the ECU – Using OBDStar G3
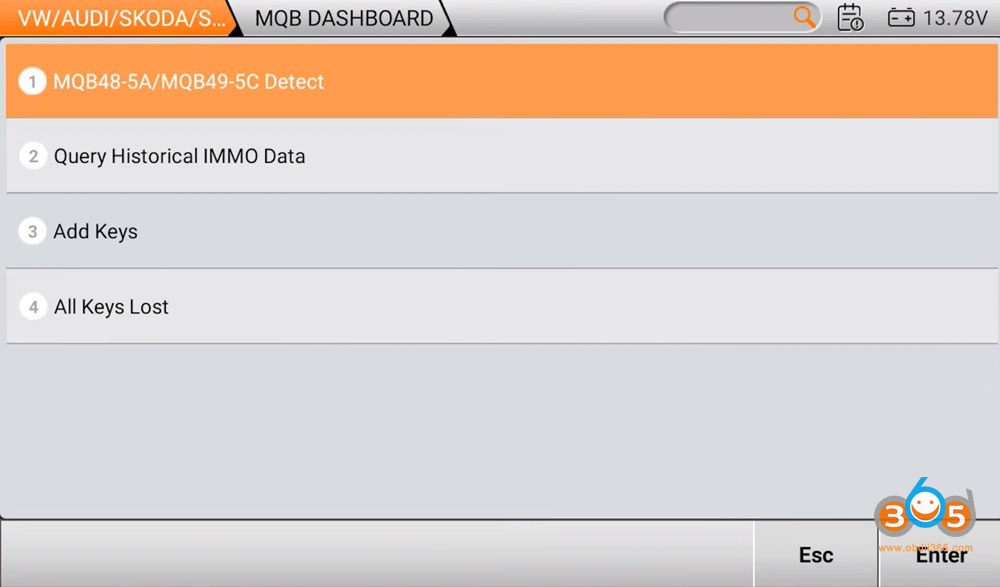
Navigate to: Immobilizer Menu > Car Europe > VW Audi > MQB Dashboard> All Keys Lost
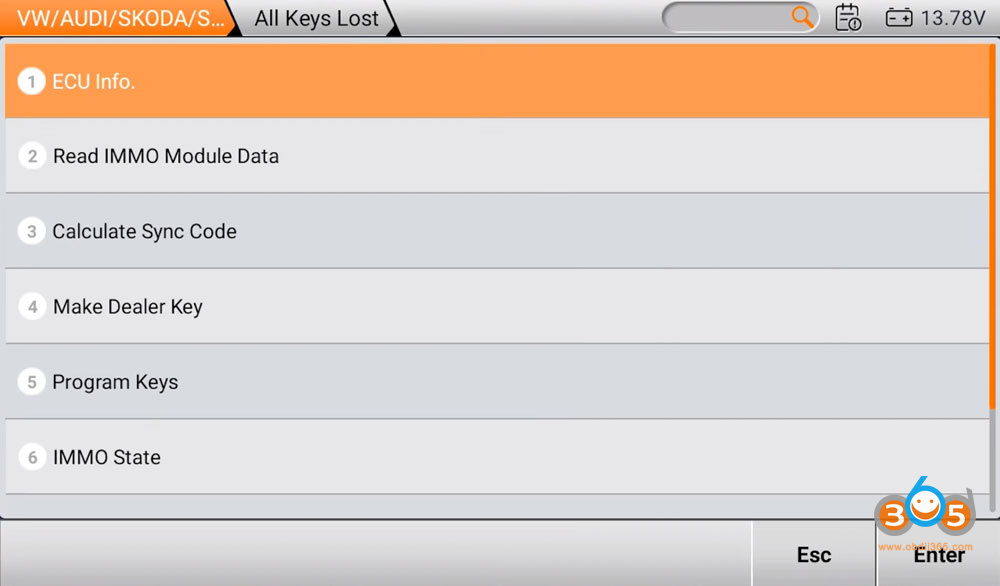
Select Read IMMO Module Data.
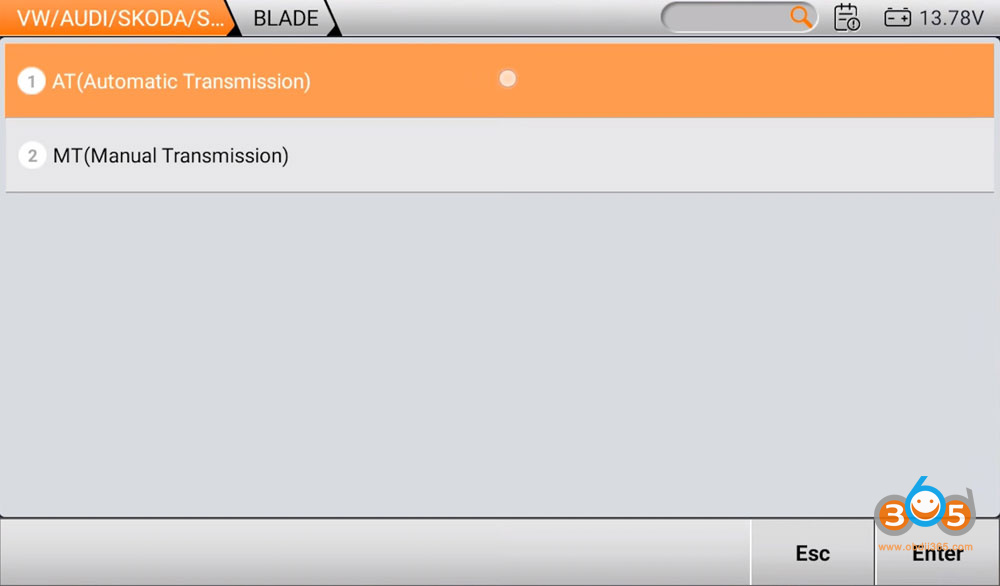
Select Blade key type and Automatic transmission.
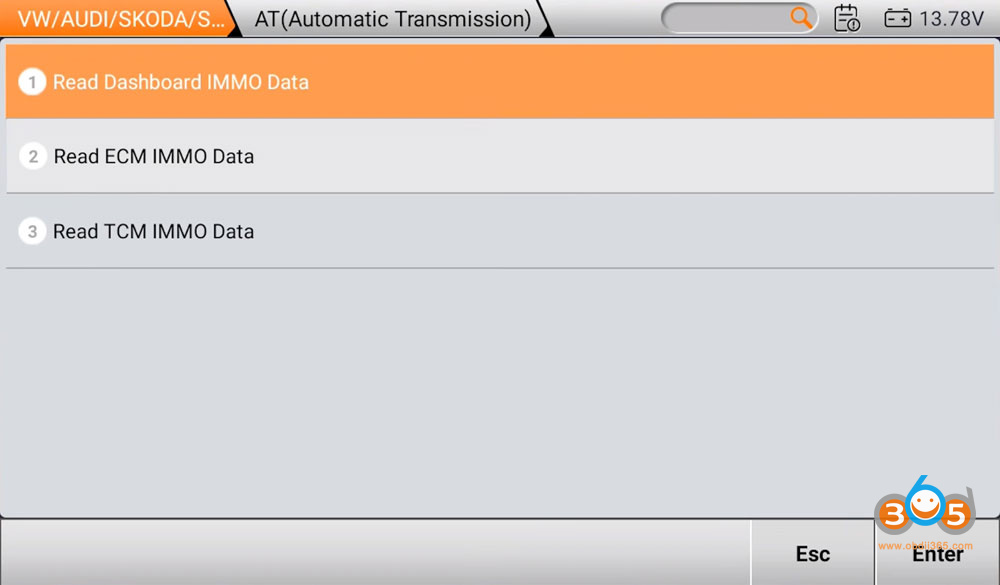
Choose Read ECM Immo data.
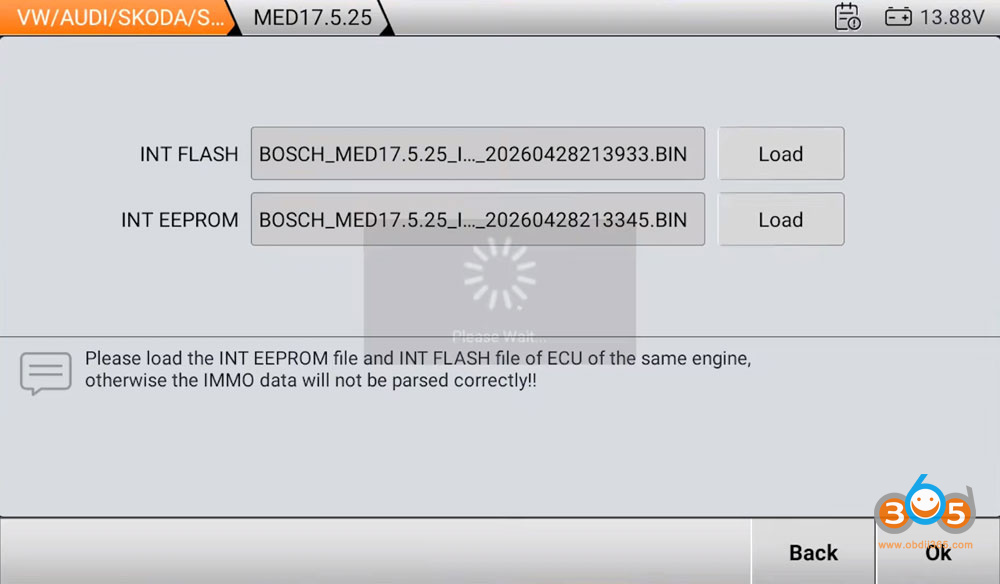
Select ECU type: MED17.5.25. Choose bench mode with MP001.
G3 will show you bench wiring diagram.
Connect ECU with MP001 and G3 follow the diagram.
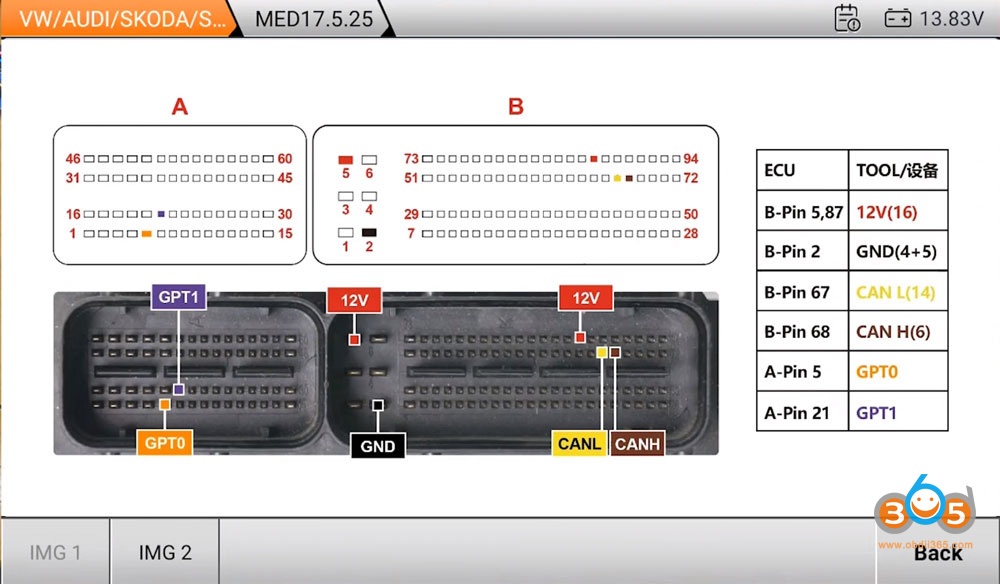
If you have OBDSTAR ECM-001 cable, the connection will be easier. Connect the MP001 adapter to the ECU using the dedicated MED17.5.25 connector.
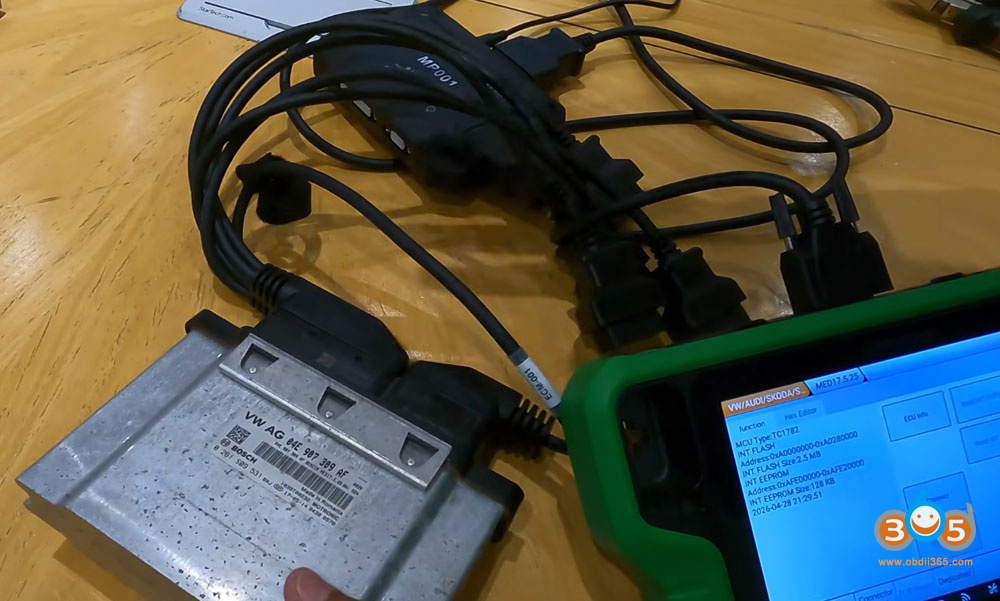
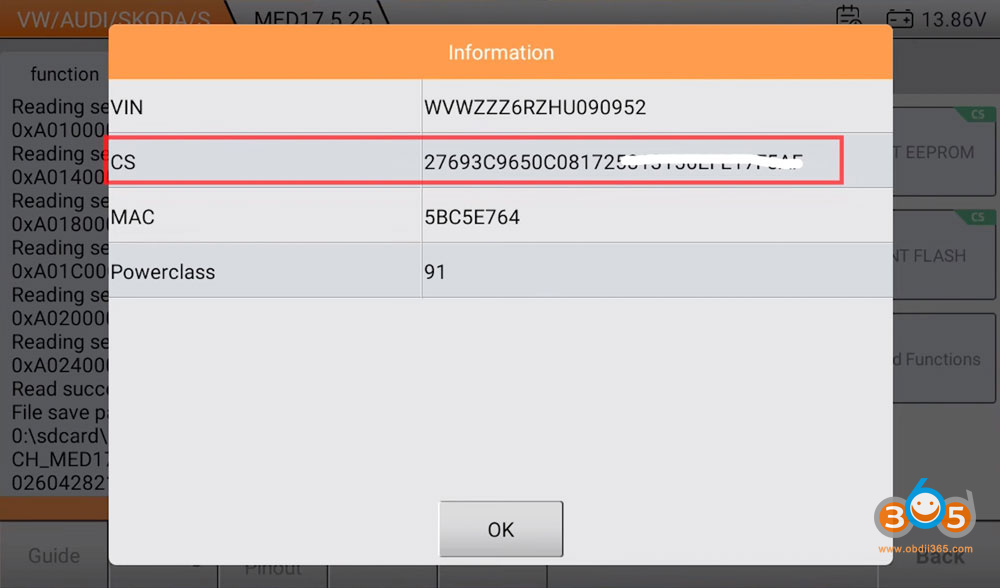
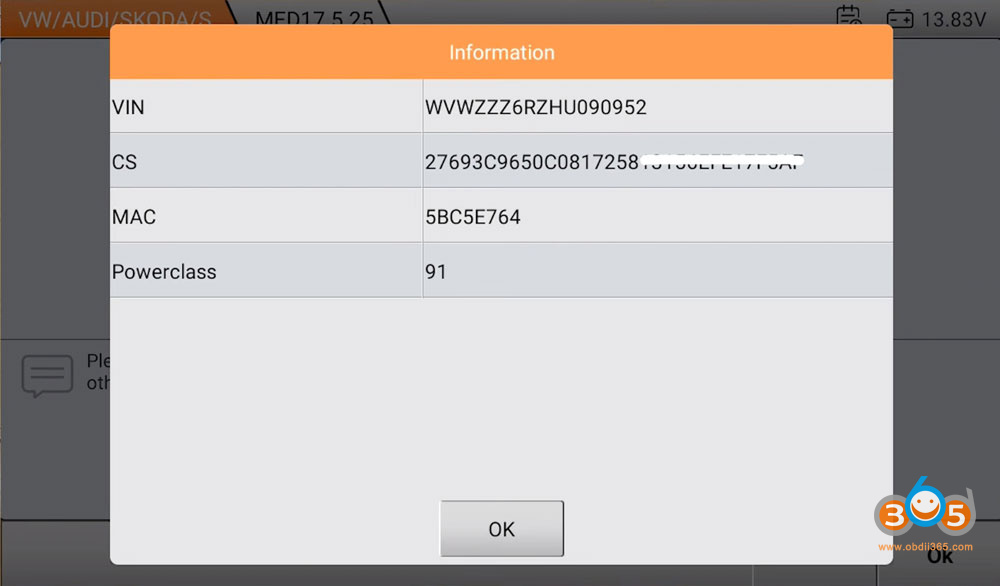
Read ECU info and detect chip ID.
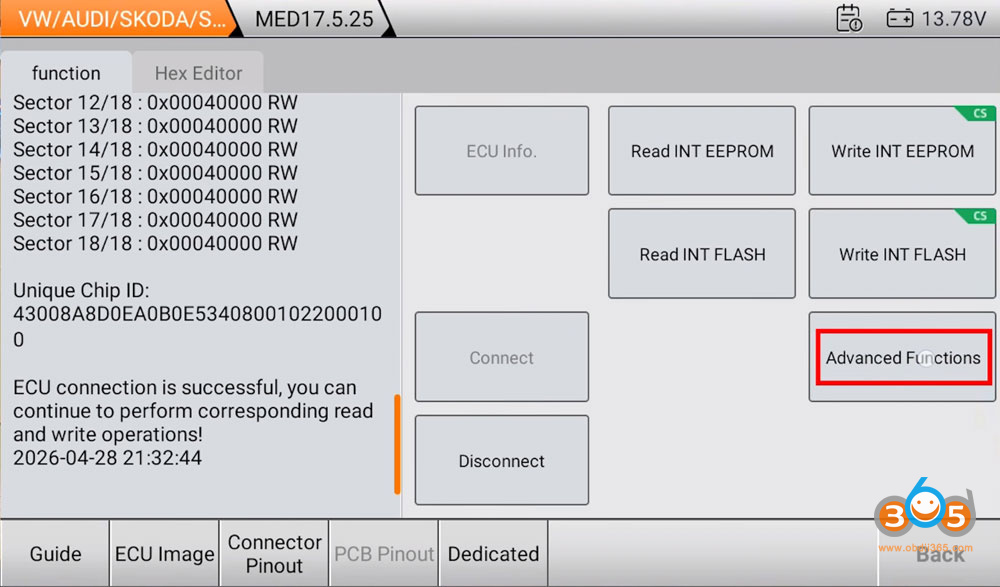
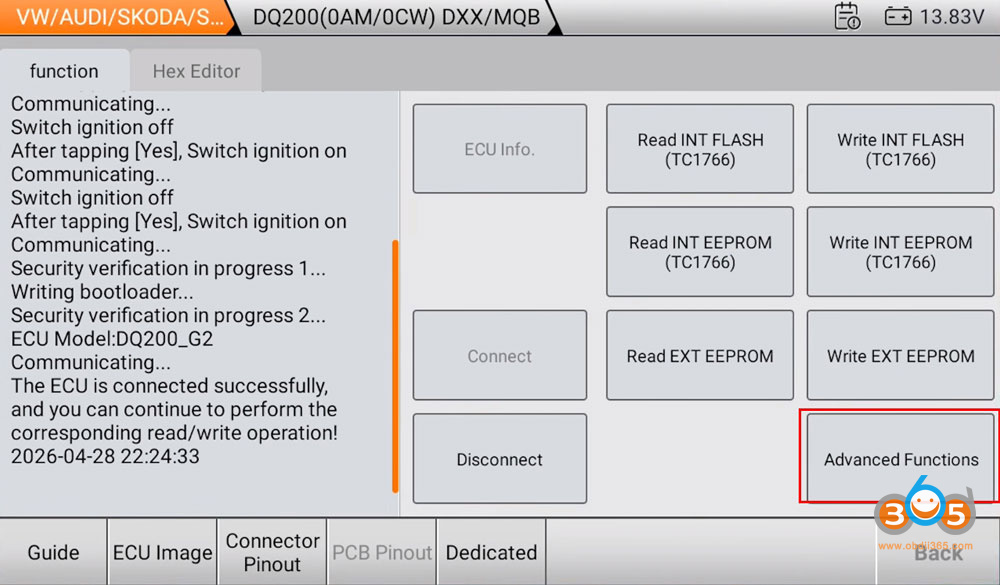
Select Advanced Functions >Read IMMO Data
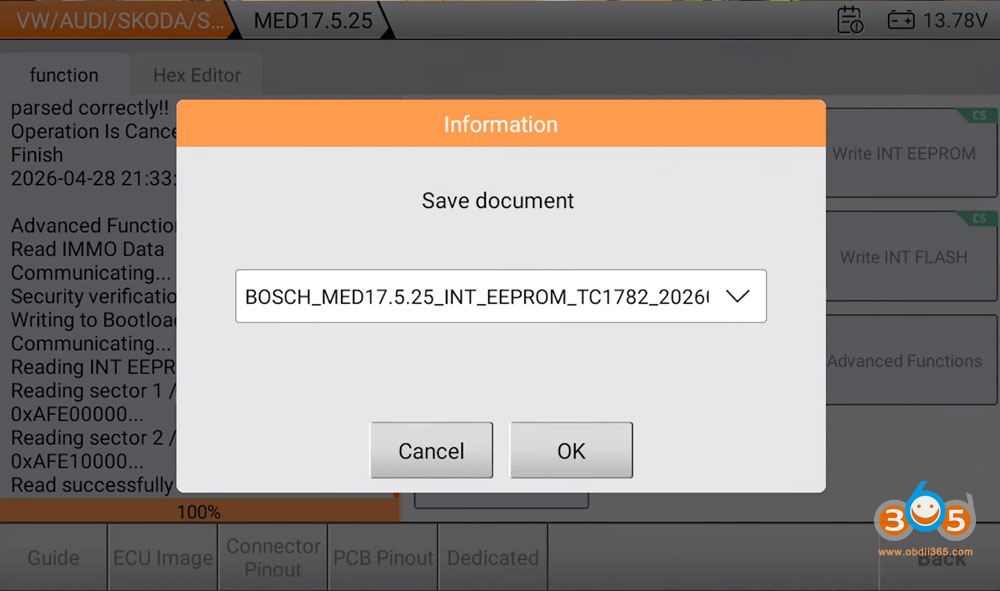
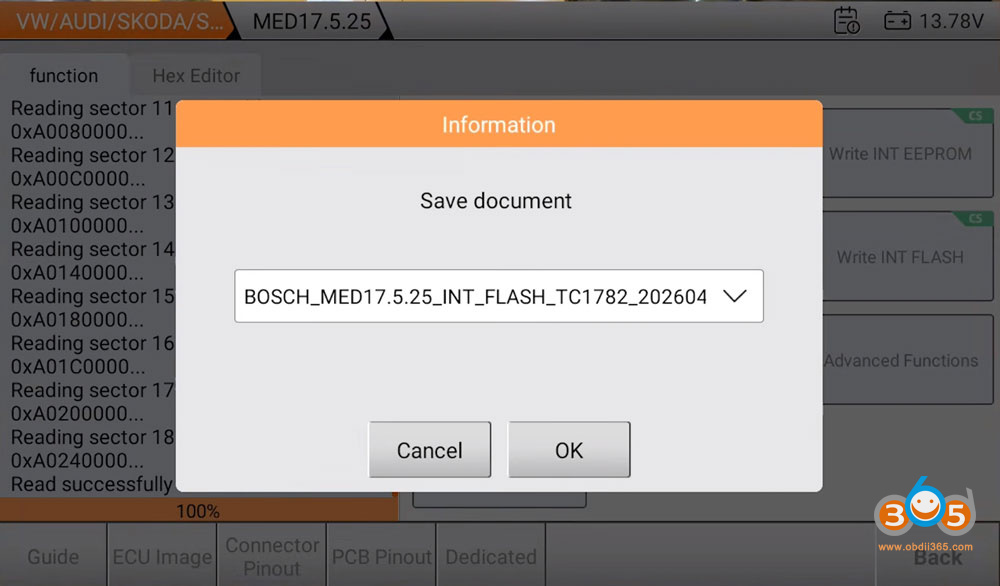
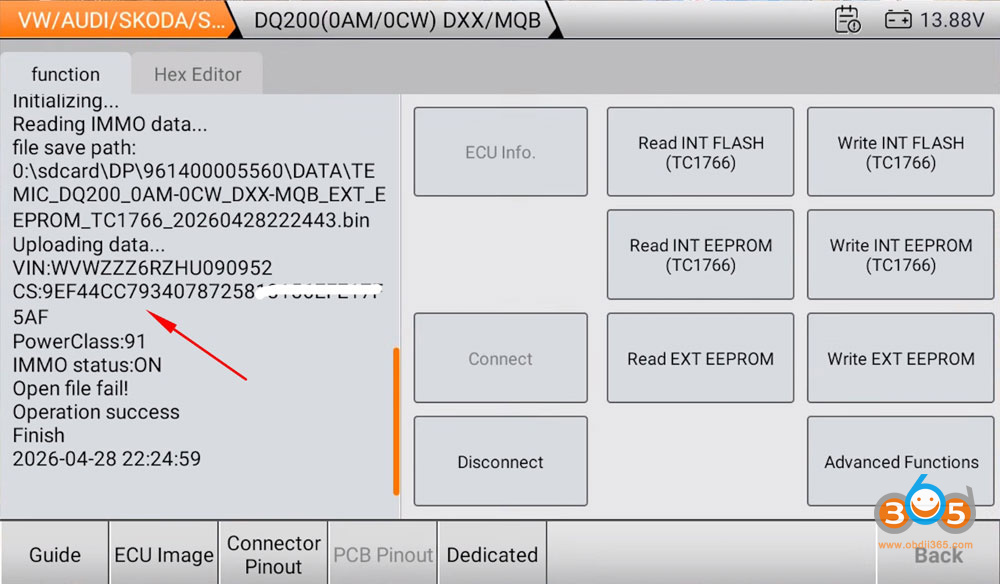
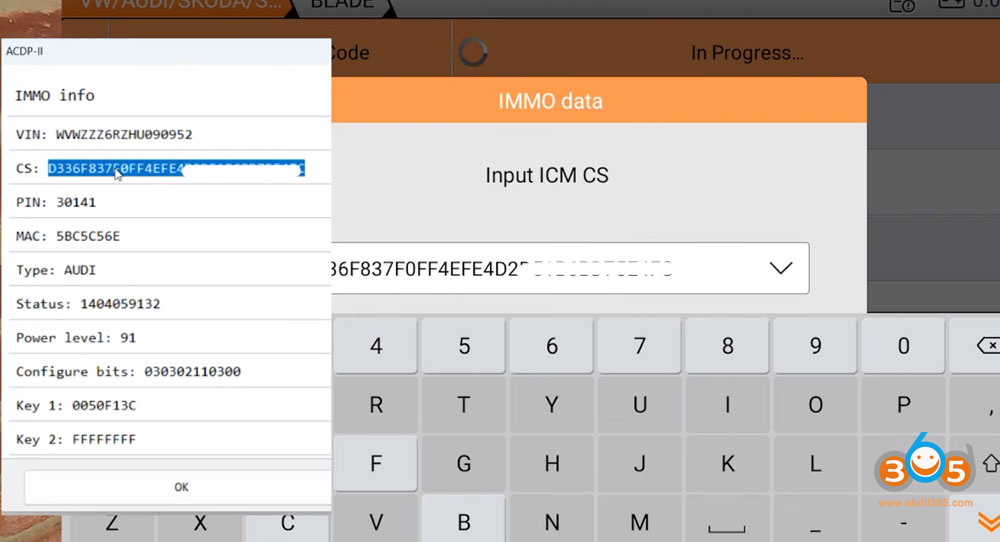
The tool will read both the EEPROM and flash file from the ECU. Once complete, the CS code (Component Security code) is displayed and saved.
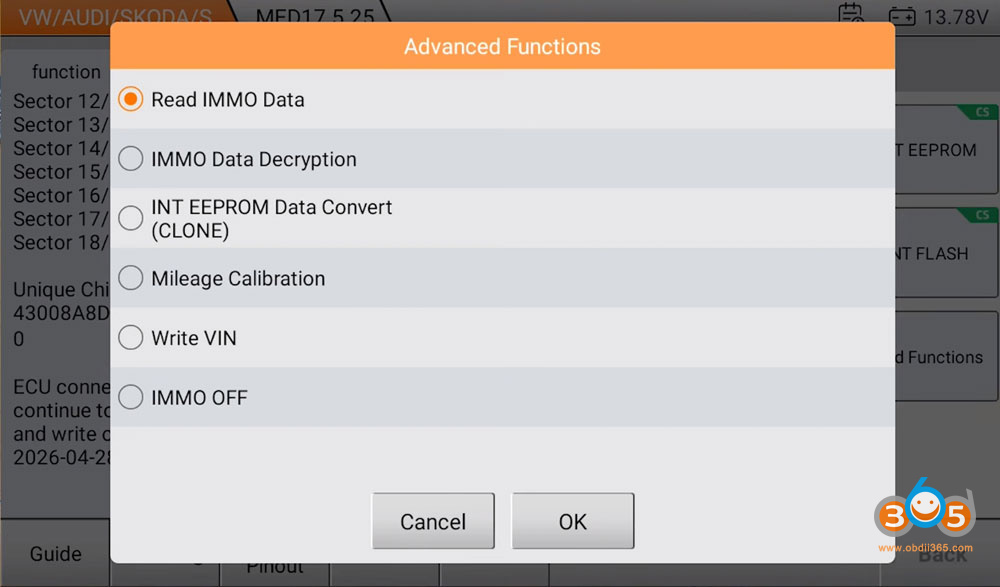
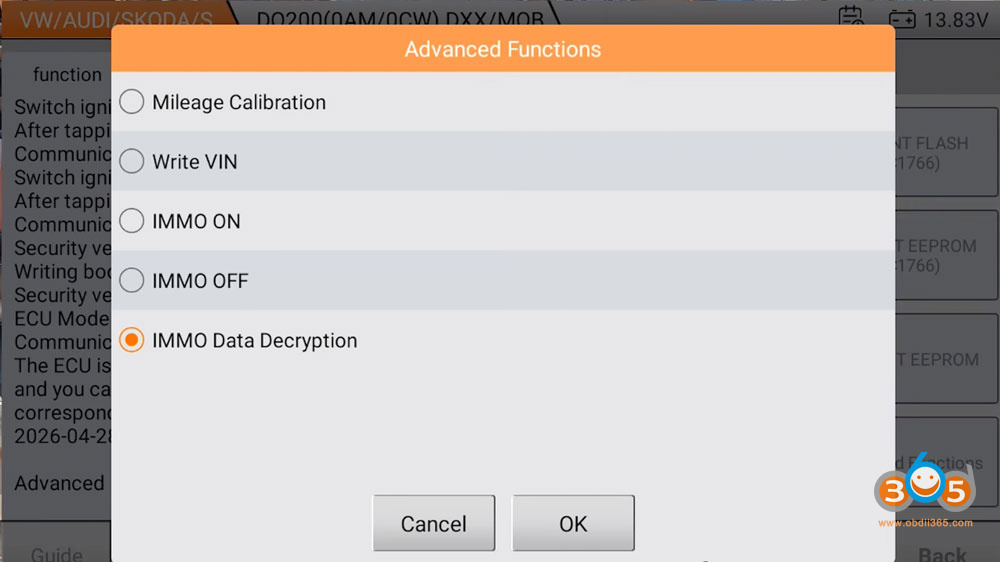
Select Advanced Functions >IMMO Data Decryption.
Upload EEPROM and flash file from the ECU to decrypt IMMO data, then save file.
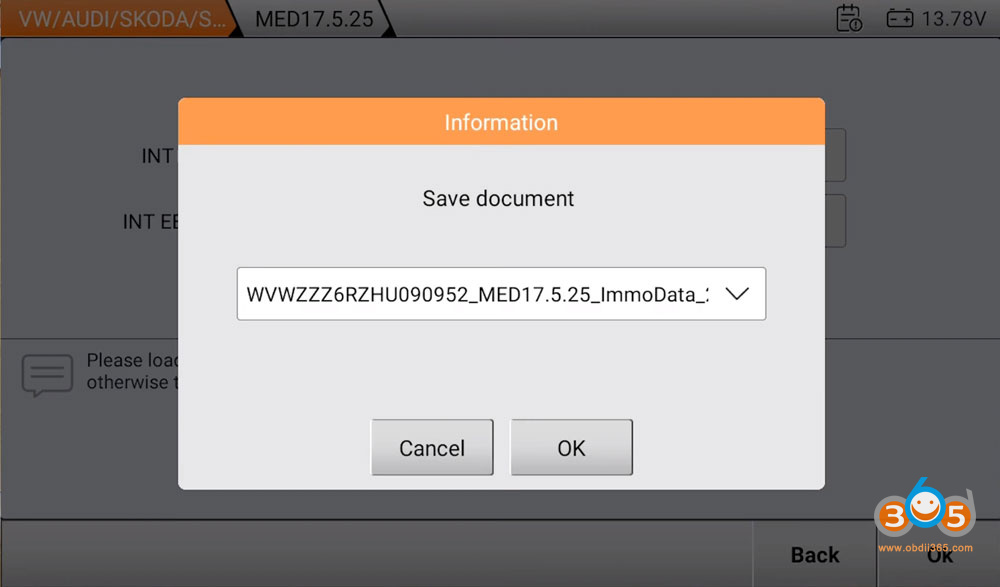
Hit Disconnect.
Note: The flash file read takes approximately 5–6 minutes due to its size.
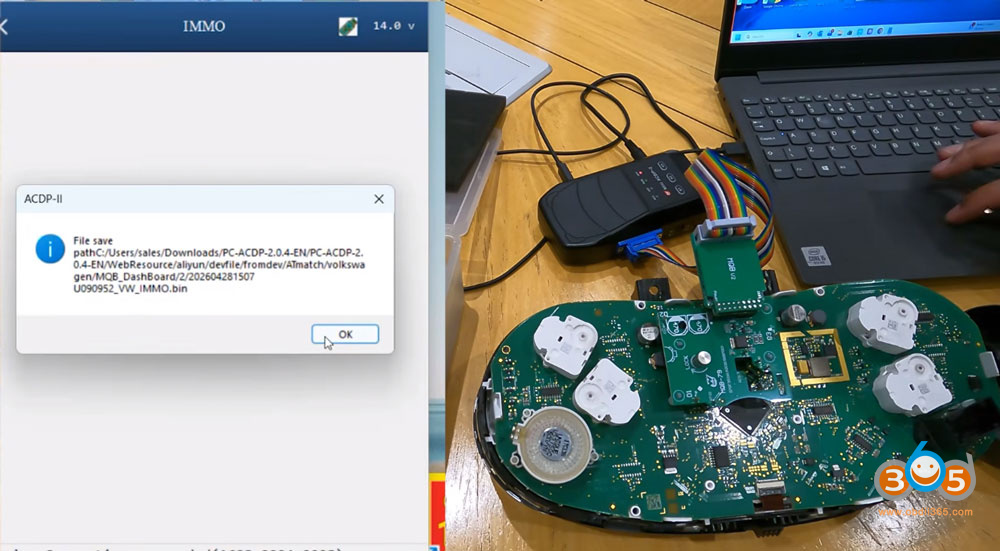
Step 4: Read the Instrument Cluster – Using ACDP (No Soldering Required)
The ACDP offers a solder-free alternative to reading the cluster.
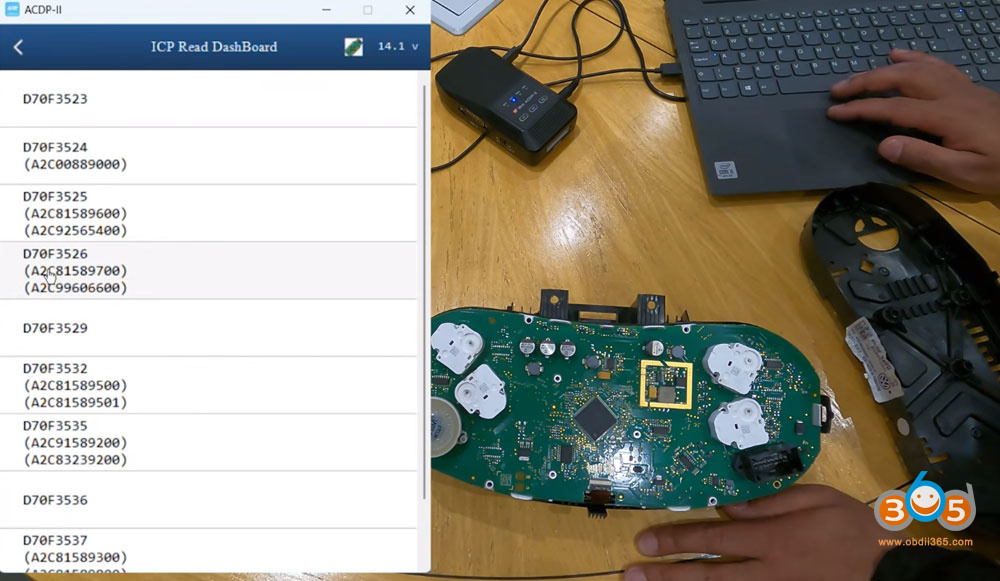
Identify the microprocessor on the cluster’s rear: D70F3526
On the ACDP, go to: VW > VW MQB IMMO(ODO)> MQB48 (VDO/JCI-NEX35xx Lock)> ICP Read Dashboard
Select the chip type: D70F3526
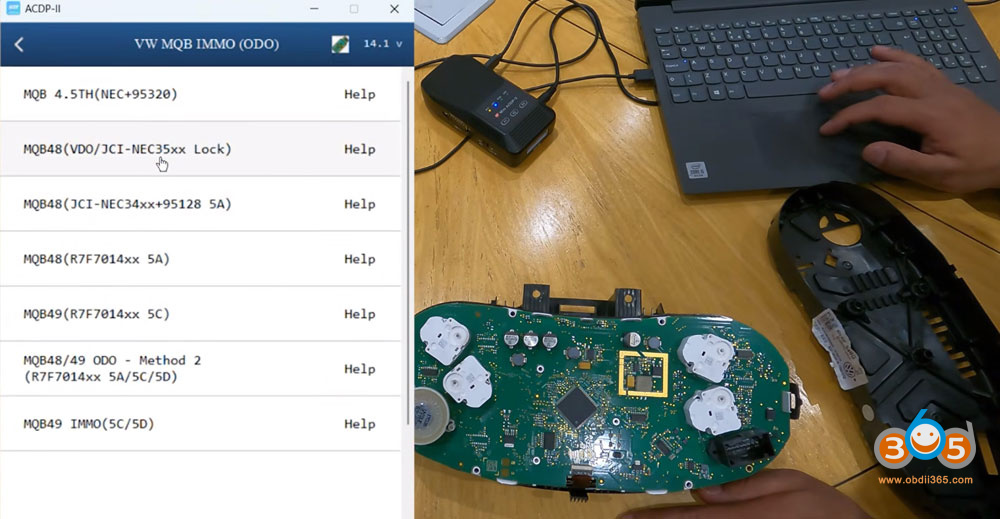
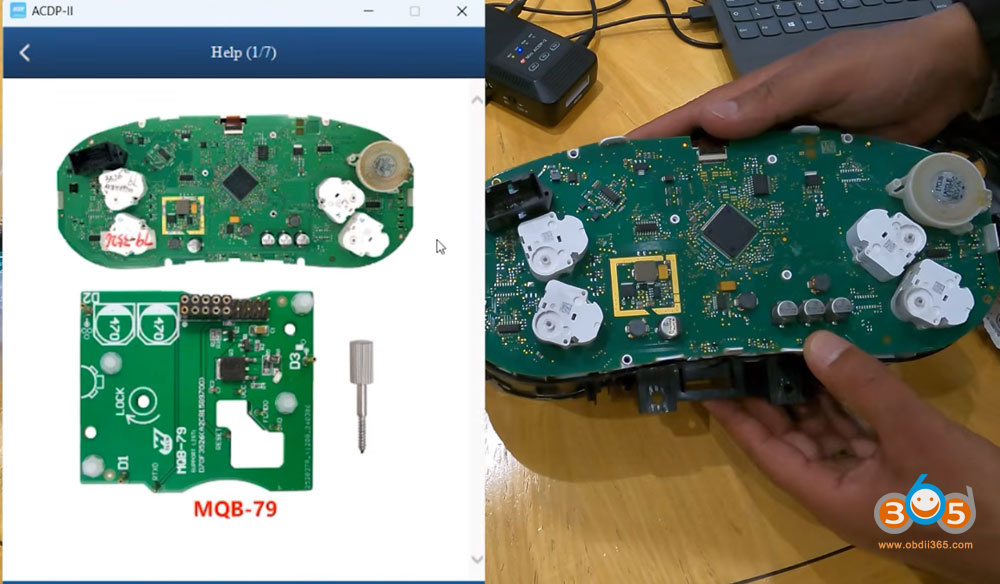
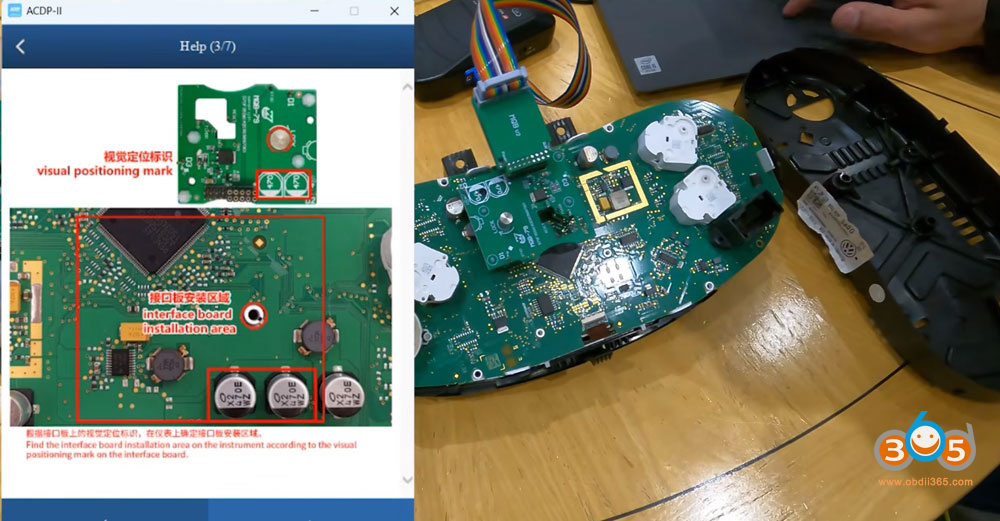
Use the help menu to match the correct interface board – MQB79.
Attach the MQB79 board to the cluster according to the diagram.
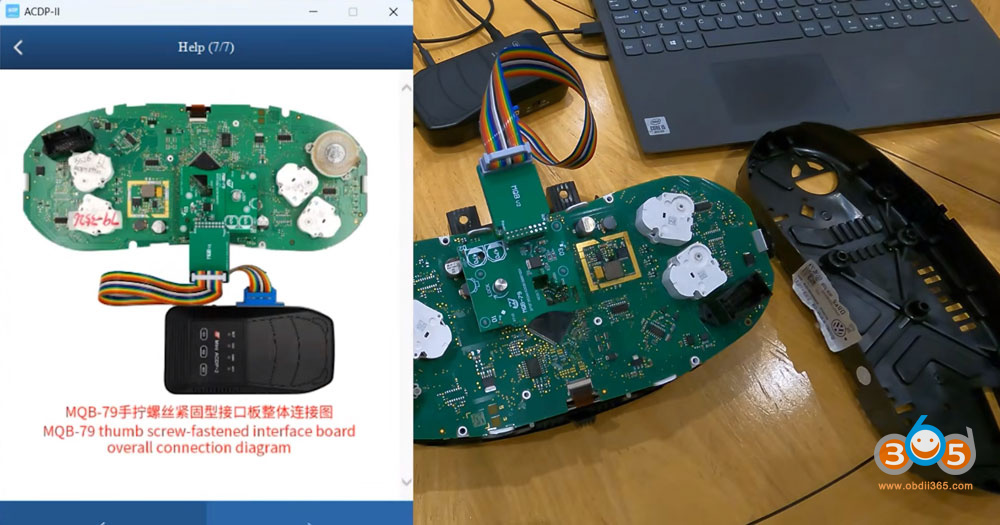
Connect the ACDP power adapter and run pin detection.
Read the chip data – the tool will automatically save backup files.
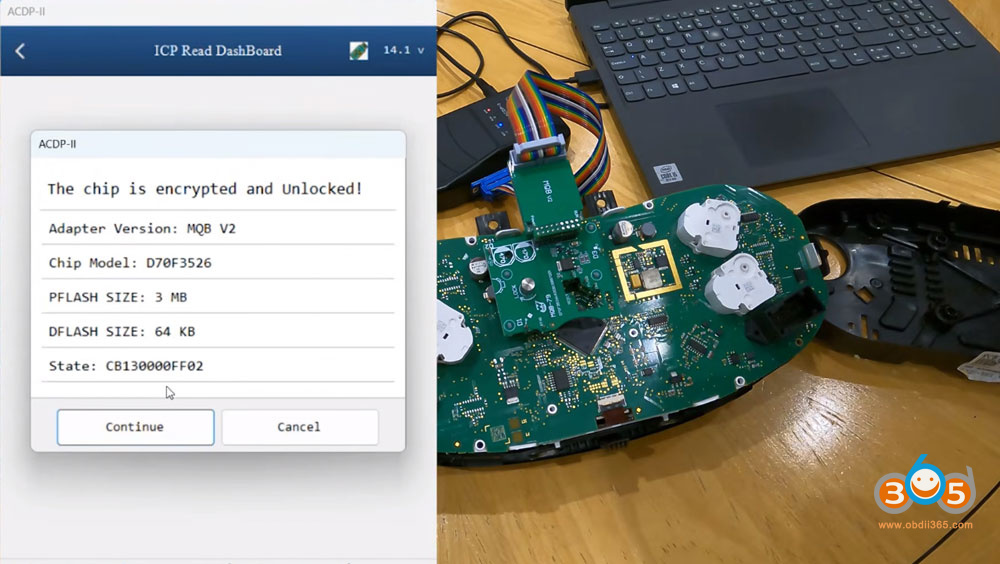
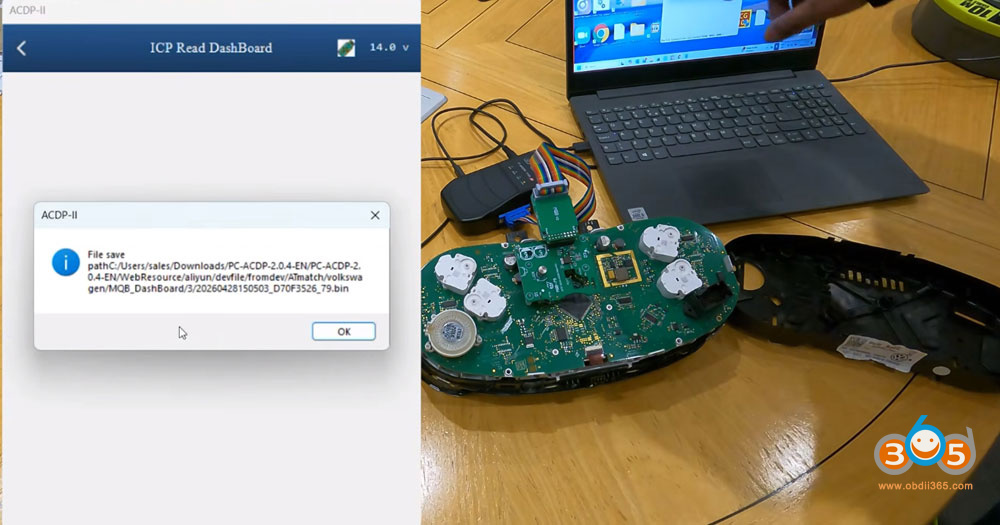
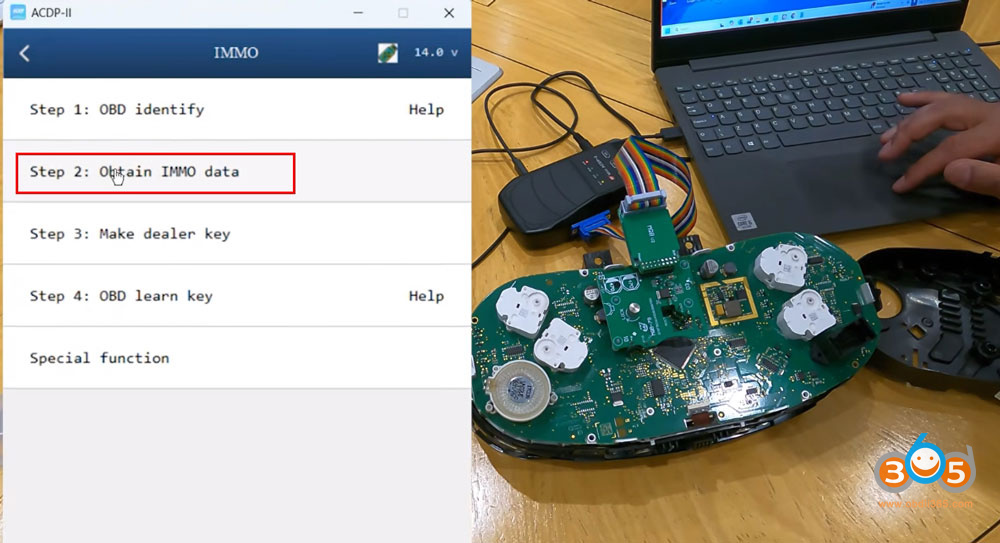
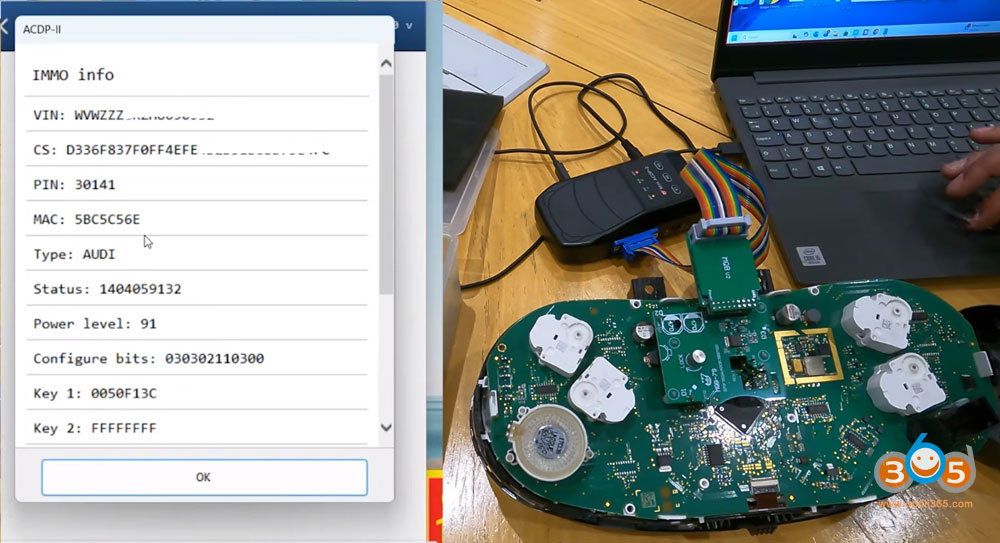
Navigate to IMMO > Obtain IMMO Data and load the recently read data.
The ACDP will calculate and display the CS code from the instrument cluster. Save this information.
Time estimate: ~10–15 minutes for the bench read.
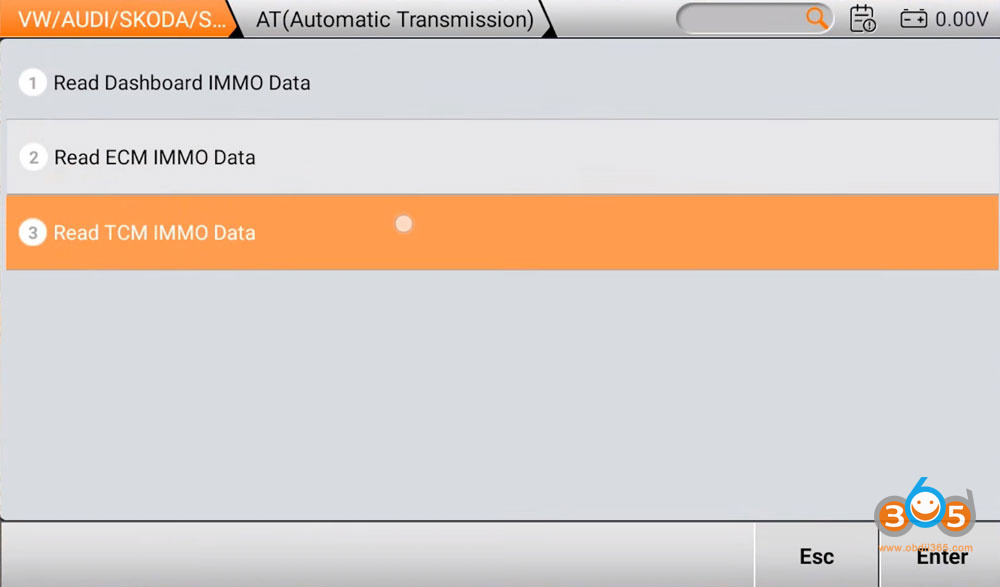
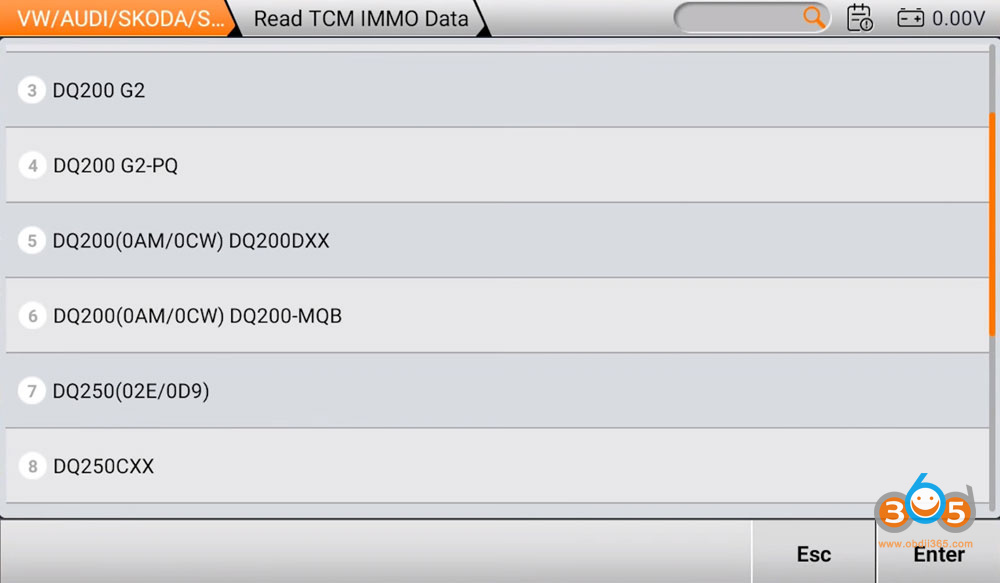
Step 5: Read the Transmission – Using OBDStar G3 with P004 Adapter
In G3 go to MQB- AKL function. Select automatic transmission and Read TCM Immo data.
Select gearbox type: DQ200.
Connect the 7-in-1 TCM cable to the DQ200 transmission module.
Attach the P004 adapter (or MP001) to the OBDStar G3.
Set the dip switches according to the on-screen guide.
Power the unit and run ECU Info to verify communication.
Go to Advanced Functions > IMMO Data Decryption.
Read and save the transmission’s CS code.
Time estimate: ~10–15 minutes
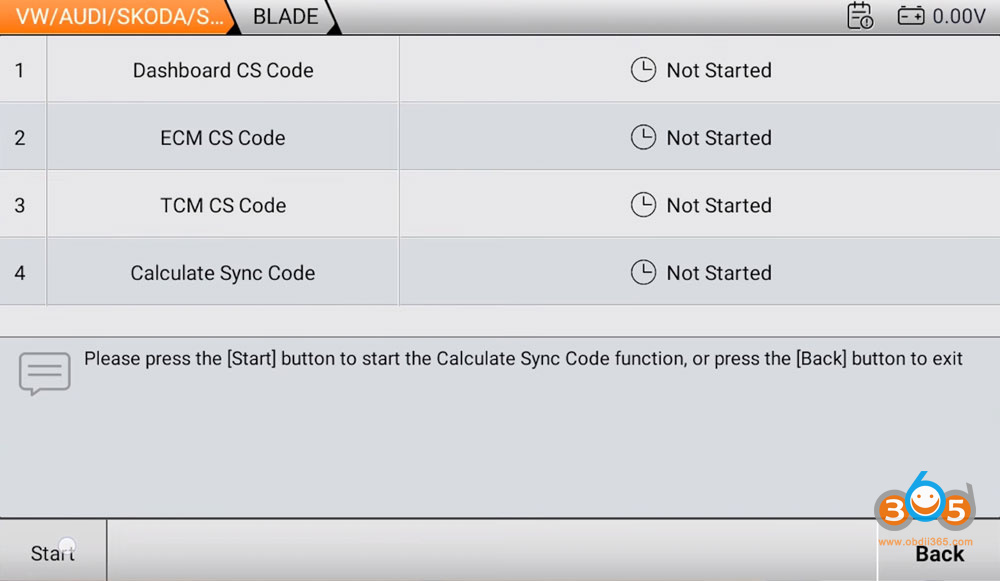
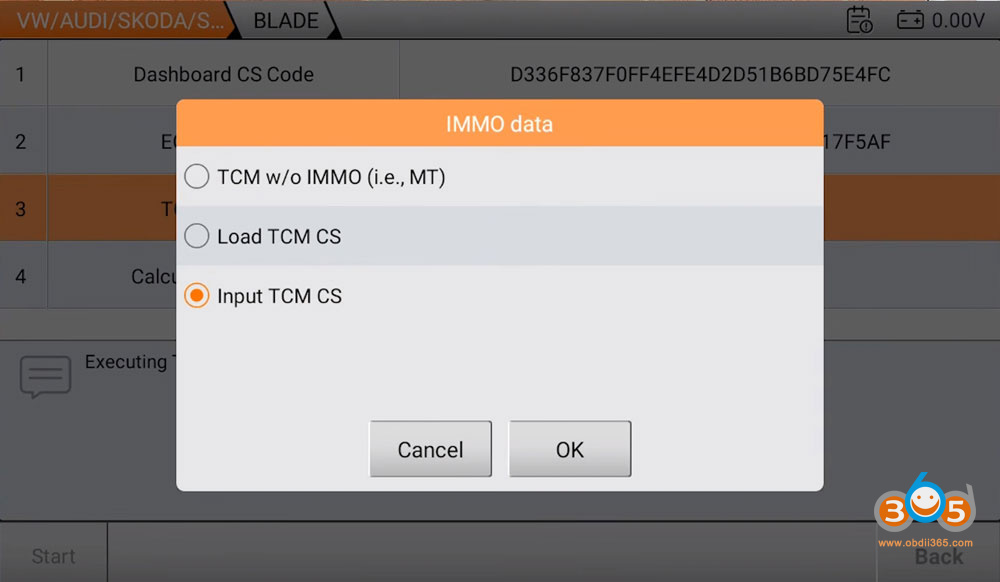
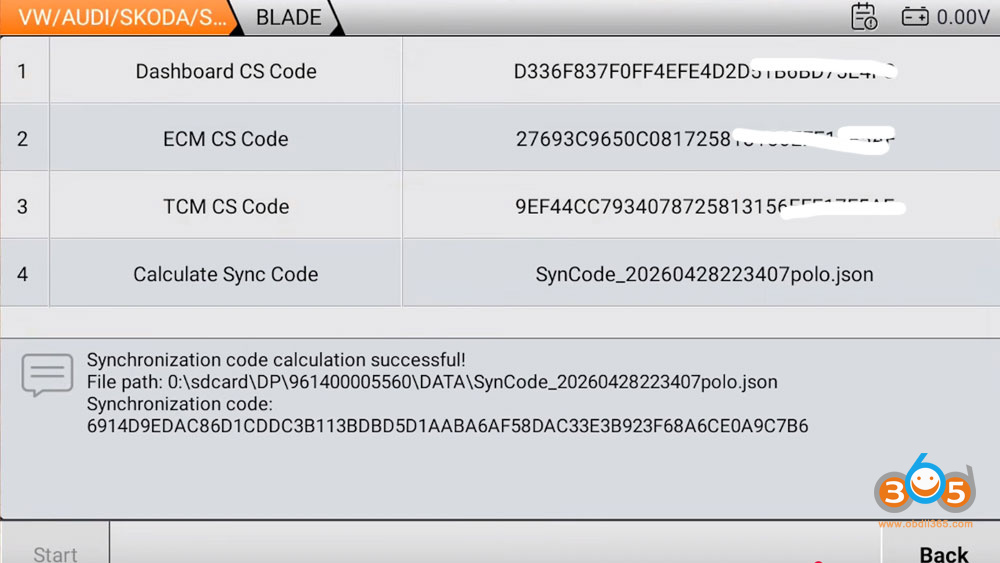
Step 6: Calculate the Sync Code
Now that you have CS codes from all three modules, it’s time to calculate the sync code—the critical piece of data that allows dealer key generation.
On the OBDStar G3, go to Calculate Sync Code.
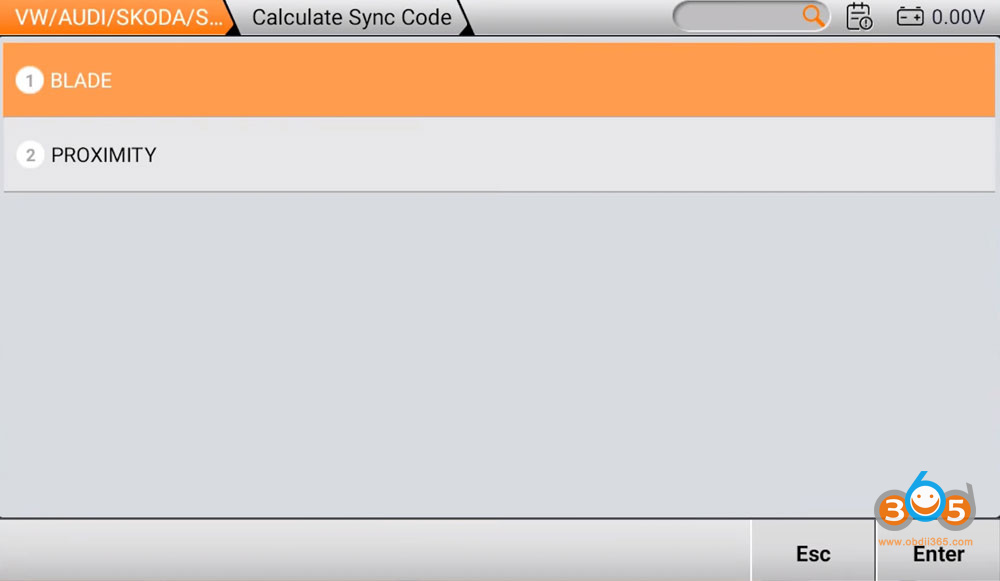
Select Bladed Key and confirm modules: Dashboard, ECM, TCM.
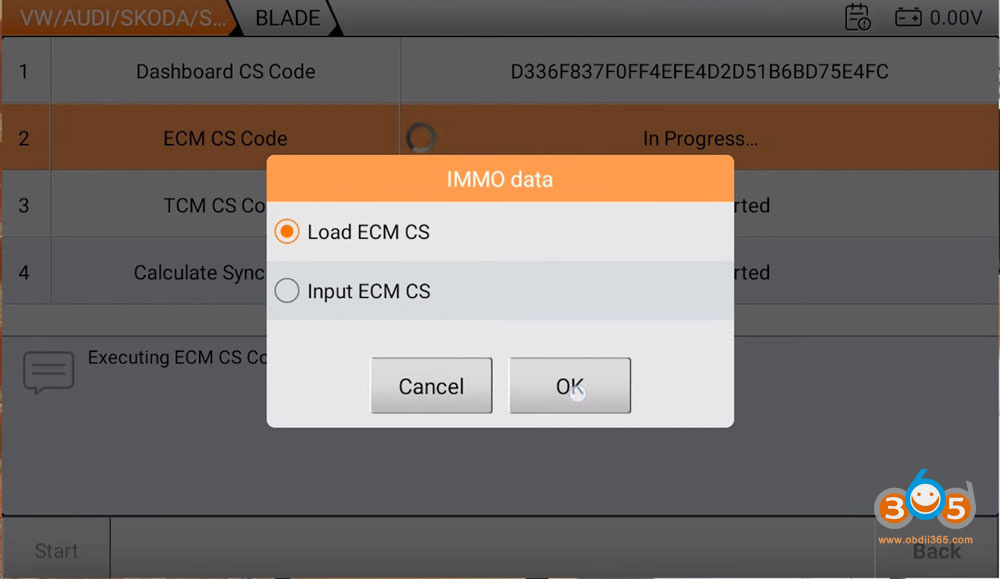
Input or load the CS codes from each module:
- Dashboard CS (from Yanhua ACDP)
- ECM CS (from ECU read)
- Transmission CS (from TCM read)
The tool will calculate and display the sync code.
Save this file for the next step.
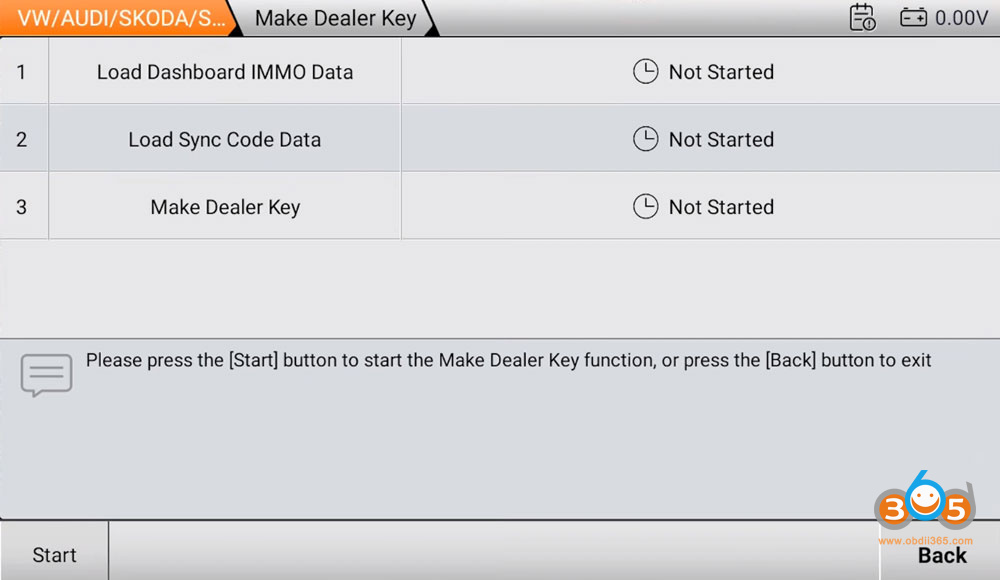
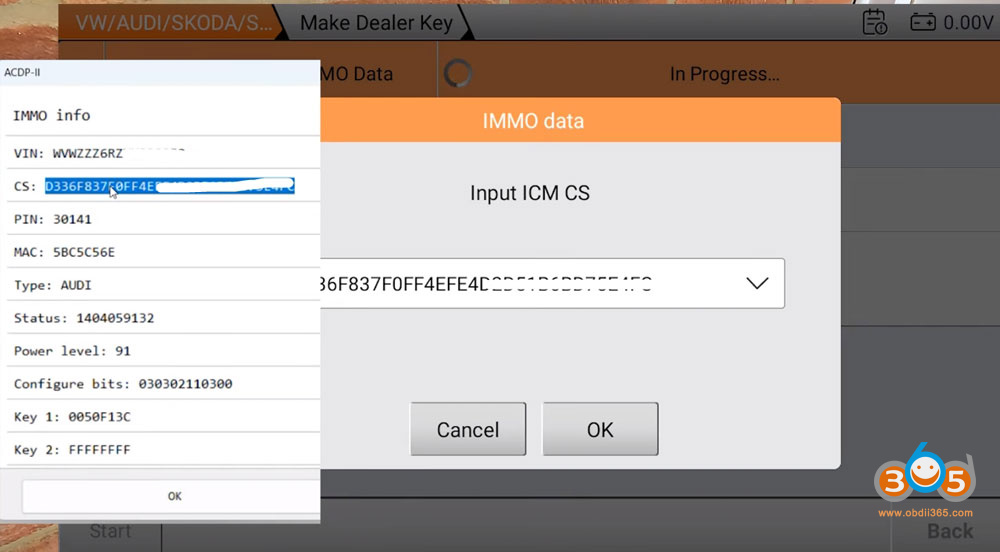
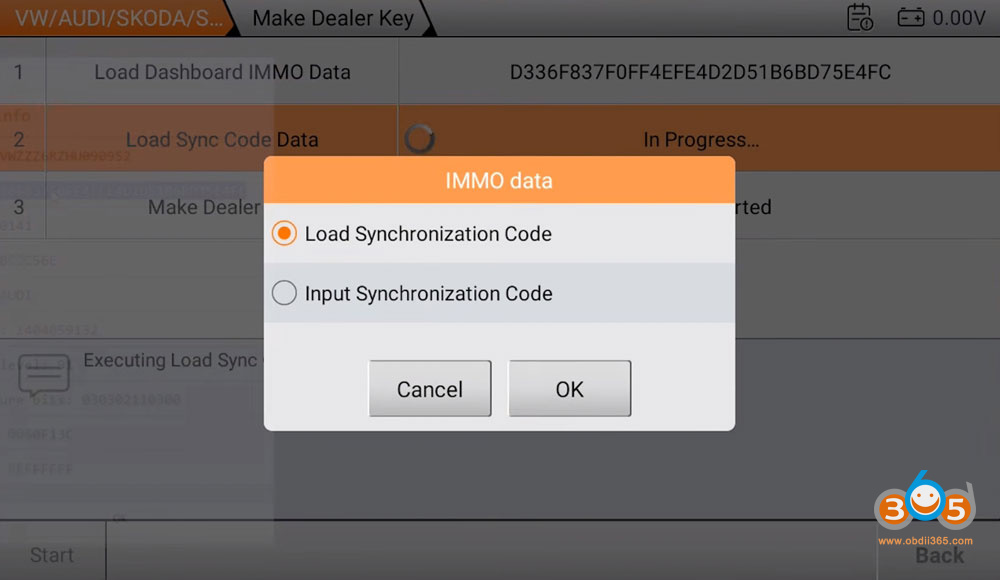
Step 7: Make a Dealer Key
On the OBDStar G3, return to the immo menu and select Make Dealer Key.
Load the dashboard IMMO data or input the CS code.
Load the previously calculated sync code.
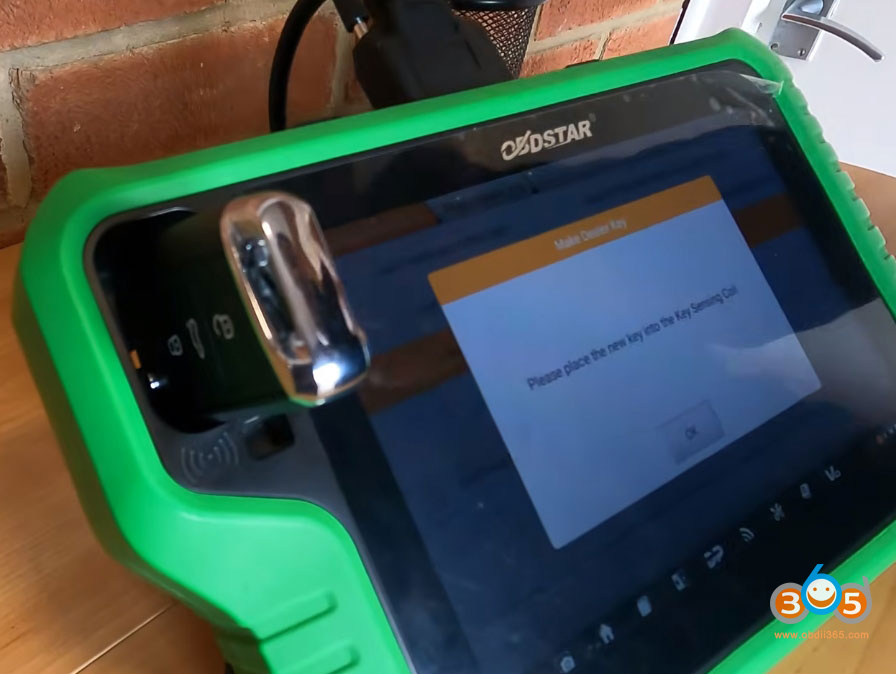
Place a new blank key into the induction coil.
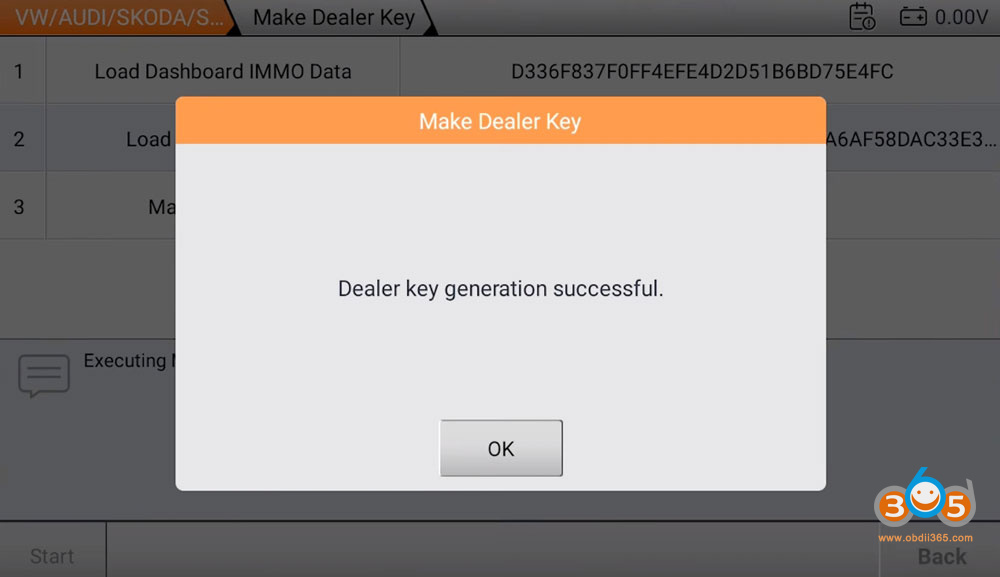
The tool will program the blank into a dealer key.
Dealer key success message confirms completion.
Step 8: Learn the Key to the Vehicle
With the dealer key made, it’s time to program it to the car.
Reinstall all modules (ECU, instrument cluster, transmission).
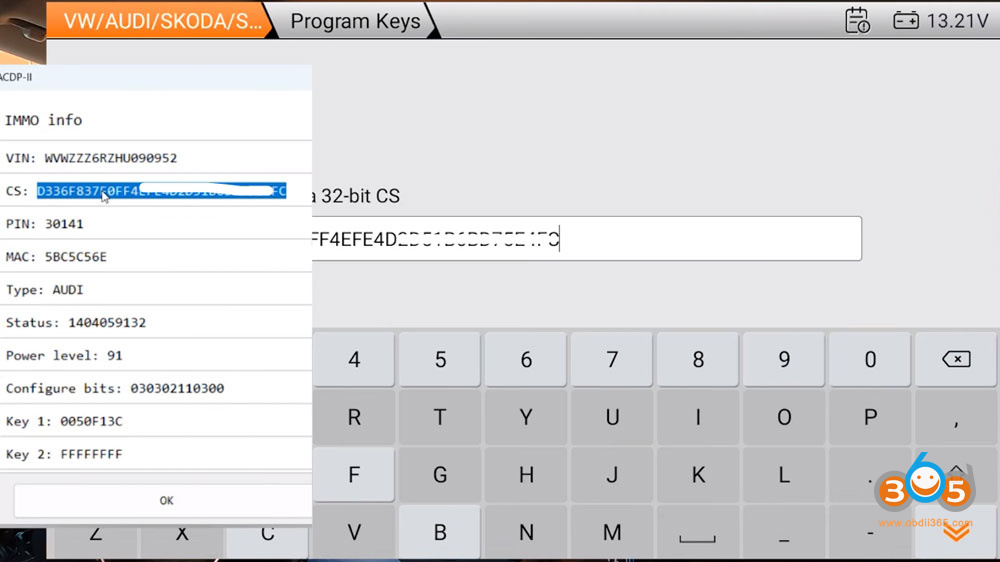
On the OBDStar, go to Program Keys.
Input the dashboard CS code again.
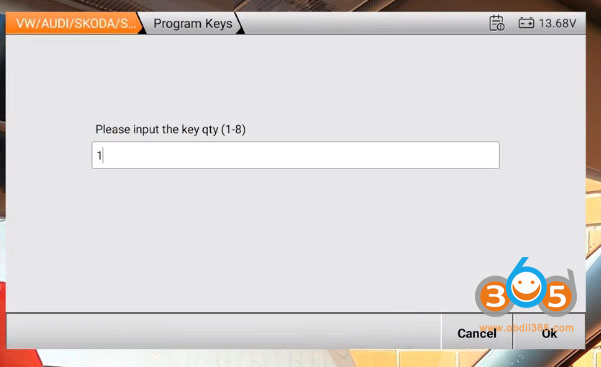
Set key quantity to 1 (since all keys are lost)
Select Bladed Key.
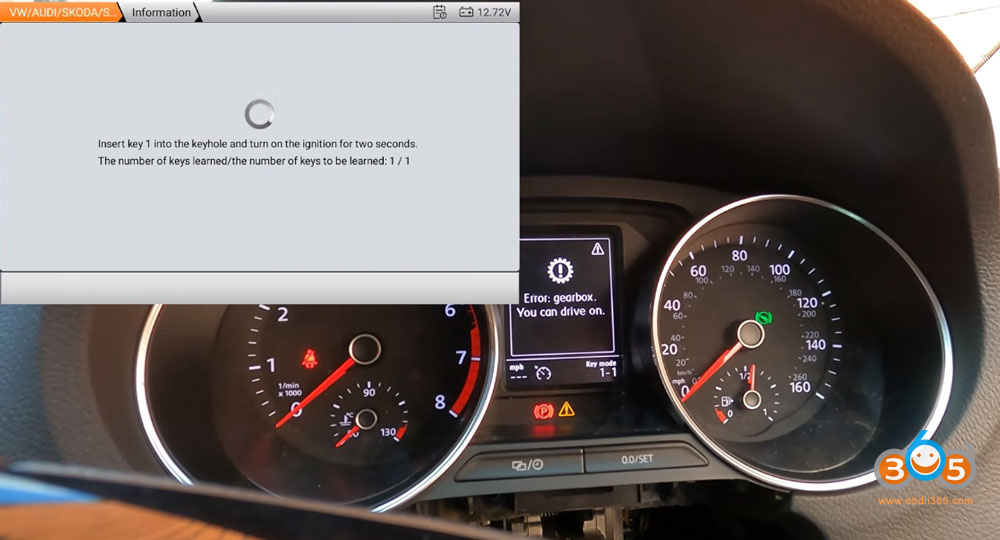
Follow on-screen instructions:
Open the hood.
Insert the key into the ignition.
Turn ignition on when prompted.
The dashboard will display: Key mode 0 of 1 -Key mode 1 of 1
Wait for Learn complete message.

Step 9: Verify Functionality
Central locking: Test with the remote – should work immediately.
Engine start: Turn the key – the immobilizer warning should disappear, and the engine should start.
Dashboard warning lights: No immo-related warnings should remain.
Total Job Time Breakdown
| Task | Estimated Time |
|---|---|
| Pick and decode lock / cut key | 15 minutes |
| Access transmission module | 15 minutes |
| Access ECU | 5–10 minutes |
| Remove instrument cluster | 5–6 minutes |
| Bench work (reading modules) | ~30 minutes |
| Reassembly | 10–15 minutes |
| Key generation and learning | 10 minutes |
Total: Approximately 1.5 to 2 hours – very achievable for a skilled technician.
Key Takeaways
- MQB all-keys-lost requires reading three modules on automatic vehicles: ECU, cluster, and transmission. If it is a proximity system, you will also need to read ELV module data. OBDSTAR also has quick ELV data collector adapter to read data easily.
- ACDP offers a solder-free read for the instrument cluster, saving time and reducing risk.
- OBDStar G3 handles ECU and transmission reads, sync code calculation, dealer key generation, and key learning.
- Always save backup files and take photos of CS codes for reference.
- With the right tools and methodical approach, this job is far less intimidating than it may seem.
Final Thoughts
The combination of OBDStar G3 and ACDP Module 33/34 makes MQB all-keys-lost jobs significantly more accessible. Using ACDP for the instrument cluster saves soldering time, while the G3 handles sync calculation and key learning efficiently.


