


If you own a Toyota Sienna and Highlander 2011 you may eventually run into this A/C problem outline in the Lexus technical bulletin.
This can also happen with Lexus RX350.
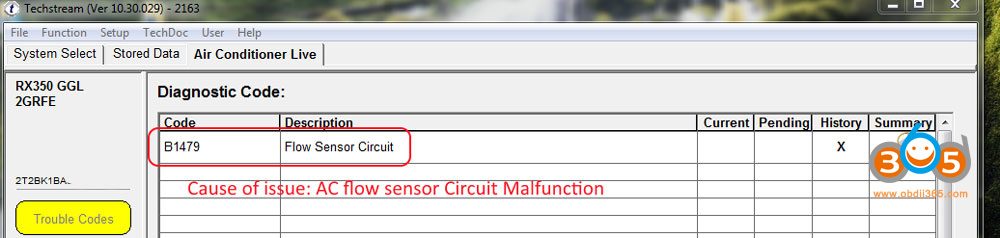
If you have this problem you’ll notice the AC blows warm air and code B1479 may be set. The A/C blows warm air because the ECU/AC control computer won’t engage the magnetic clutch on the A/C compressor because it sees a “faulty signal” from the compressor flow sensor.
Unfortunately this sensor is attached to the compressor (not sold separately) and Lexus’s solution is to replace the compressor. The estimated parts+labour cost is around $2000.
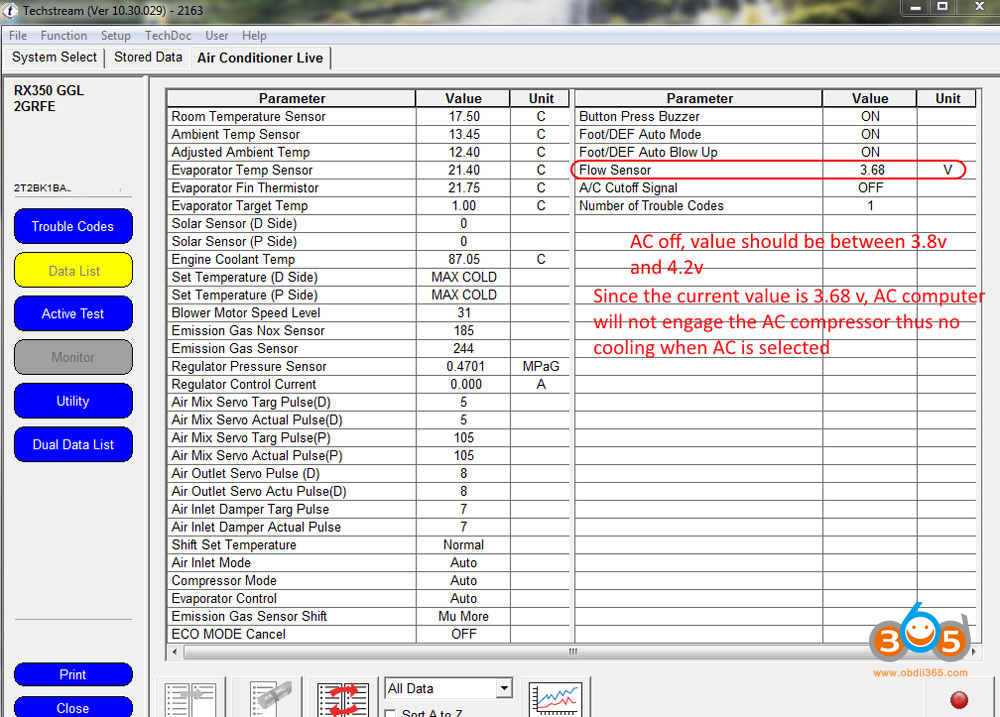
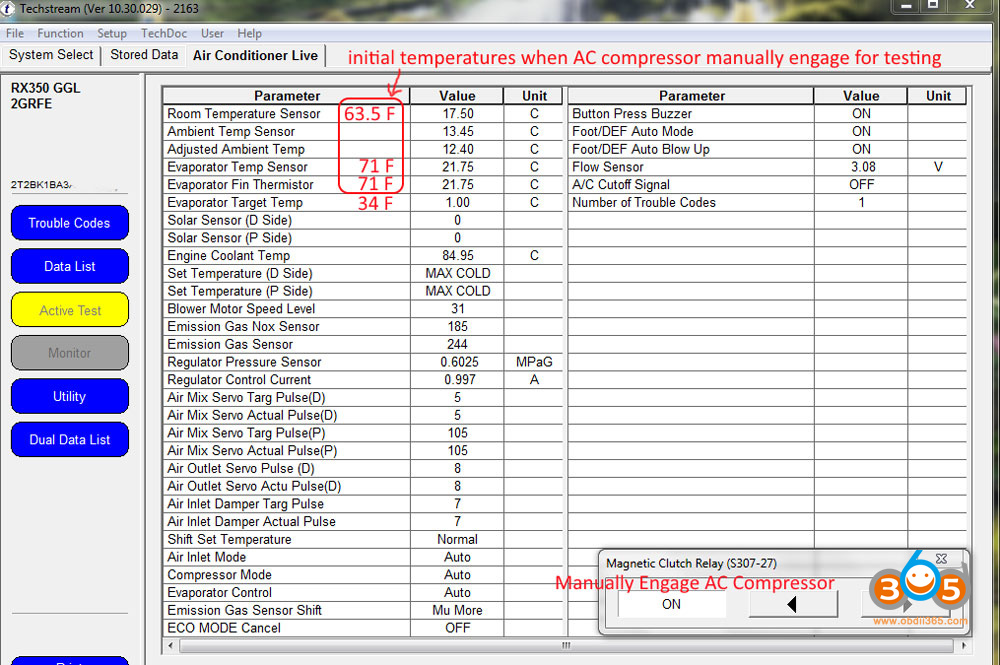
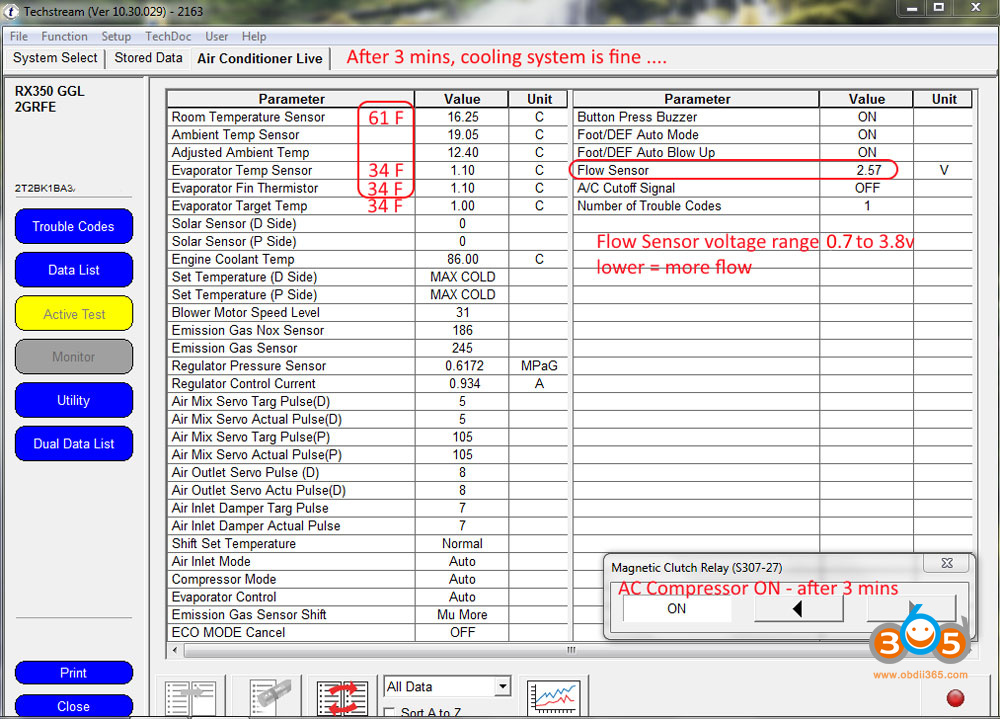
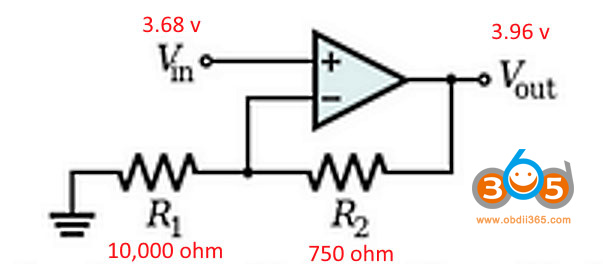
The A/C computer expects 3.8 to 4.2 V from the sensor when the A/C is off and below 3.8 V when the A/C is ON. (the lower the voltage the more refrigerant flows). On a Lexus the flow sensor output was 3.70 V when the AC was off, so the A/C computer panics and won’t engage the system. Using Toyota/Lexus’ techstream software you manually engaged the compressor and found that the A/C cools just fine. More importantly though, the AC flow sensor was working! (you can see the flow rate fluctuate)
Therefore the problem is that the sensor voltage had dropped below 3.8 V when the A/C button is off. All it needed was a little boost (in my case, from 3.7 V) so that it’ll fall within the valid range. In my case, I want to multiply the 3.7 V by 1.07 = 3.96 V. To scale up the voltage I used a non-inverting operational amplifier. You can buy all the component from Amazon/digikey for less than 30 dollars. The output of the AC flow sensor is fed to the amplifier, and the output of the amplifier goes to the AC computer. Inserting this amplifier made the A/C system work again.
Basic steps are outlined below:
1. Get a Mini VCI Techstream cable/software and connect to your car to verify the problem (i.e. flow sensor output below 3.8 V and that the cooling system works when the compressor is manually engaged)
2. Remove the glovebox to gain access to the A/C computer (there are many steps involved, including removing the SRS knee airbag on the passenger side)
3. Design a non-inverting operational amplifier (this is easier than you think, check wikipedia article on operational amplifier)
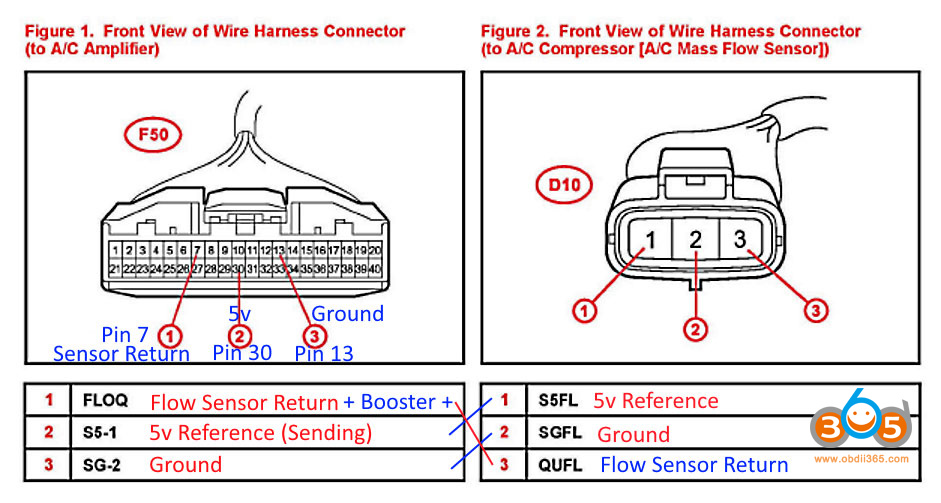
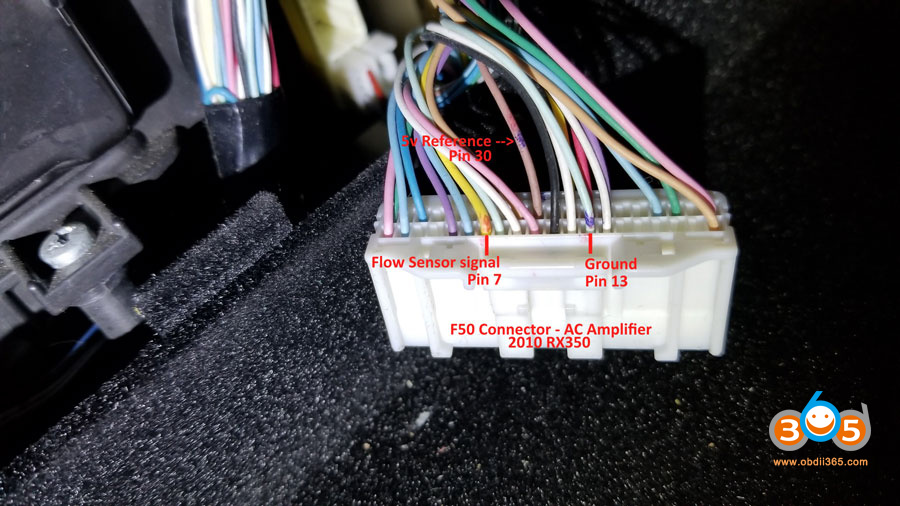
4. Insert the amplifier between the compressor flow sensor and A/C computer. The amplifier power supply and ground should use the same ones as the flow sensor (pin 30 for power and pin13 for ground on the AC computer). The flow sensor voltage is fed to pin 7. you’ll have to cut this line to insert the amplifier.
5. enjoy your A/C go spend $2000 somewhere else!
The circuit is in the diagram below. I used R2=600 Ohms and R1 = 10,000 Ohms.
Vout = (1+600/10000)*Vin=1.06

Another successful B1479 fix
User report:
I have the same AC issue with my 2010 RX350, got the TechStream software installed and confirmed DTC code B1479 on my vehicle, with AC off, flow sensor voltage is 3.68v.
By manually engaging the magnetic clutch, AC compressor was running fine and system was cooling just fine. So my next step would be getting some LM321 op amps.
Just rigged up an AC flow sensor boost circuit using IC 741 op amp (instead of LM321 op amp), bench tested it, corrected one mistake, then installed in my 10RX …. works great, my AC system is cooling again.
Here is my experience:
– Install the TechStream sw on to my 64-bit Win7 laptop. TechStream sw is only compatible with 32-bit OS version of WinXP/Win7 and should install just fine without any additional steps. To install in Win7/Win8/Win10 64-bit OSes, you will need to extract the included driver from the MVCI driver for TOYOTA.msi file then install the mini-VCI cable drivers manually.
After installing the TechStream sw & mini VCI cable driver on your laptop, take the laptop to your RX, with engine still OFF, connect the mini VCI cable to the OBD2 port (located driver side/below the dash/above the brake pedal area). Start the engine (parked/idle), start TechStream sw on laptop and select “Connect to vehicle”.
– In my 10RX, the AC amplifier is located to the right of the cabin air filter (located behind a door in the back of the glove compartment) … and I could easily unplug the big F50 connector, locate the 3 wires needed to feed to my booster circuit … a picture is worth a thousand words, so here are some pictures
– took about 20 mins to build the booster circuit, 10 mins to install it in my 10RX …. 30 mins total, saving about $2000 … best feeling ever.
pics 1-4 are screenshots before any booster circuit is installed.
After you confirm that your issue is B1479 and the low flow sensor voltage (below 3.8v when AC is OFF, i.e. pics1-2) you can then select “Active Test” (yellow highlighted button in pic 3) then select Climate Control (or Air Conditioner) subsystem then choose “Magnetic Clutch Relay” test, and then select ON to manually engage the clutch to see if your AC compressor is running and producing cold air (pic 3). Then observe the temperatures & flow sensor value (should be dropping) in pic 4. If everything looks good then you are sure that a booster circuit would likely fix your B1479 issue. Then select OFF to turn off the Magnetic Clutch Relay before exiting the TechStream sw. Depending on how low your Flow Sensor value (when AC is OFF) you should use a different R2 value to boost your Flow Sensor value to around 4v (good valid range is 3.8v – 4.2v).
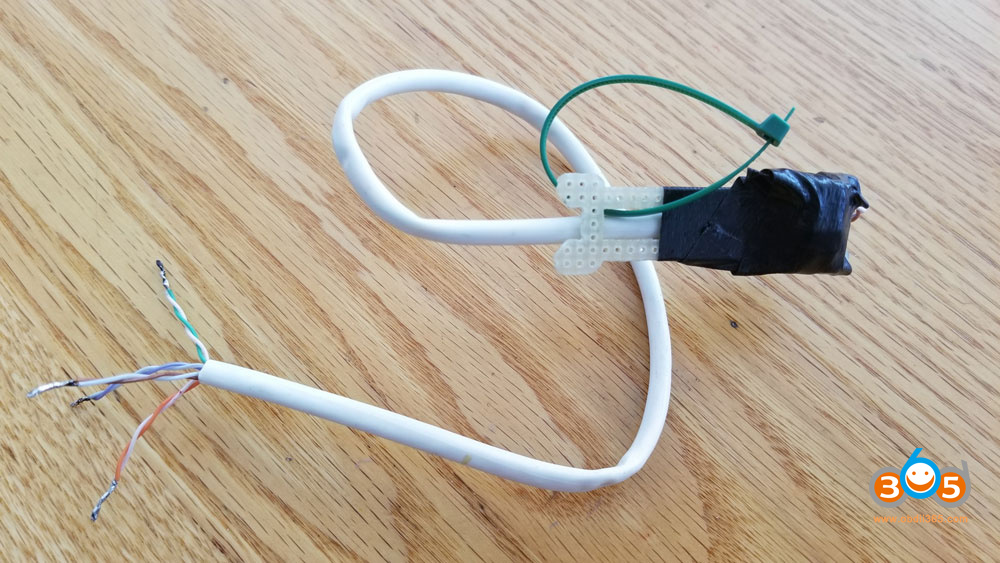
To build a booster, see diagram for connection reference, depending which op amp you will use, the op amp pin numbers may be different but connection is the same You will need a cable with 4 wires. I used a short CAT5/6 cable (4 pairs, each pair is joint as a singe connection for additional strength & better current flow). However, the OEM wires from the [F50 connector] pins 7/13/30 are thin (probably 24 gauge wires) so you could use only 4 single wires of the CAT 5/6 cable, these are also 24 gauge wires.

AC Flow Sensor Range
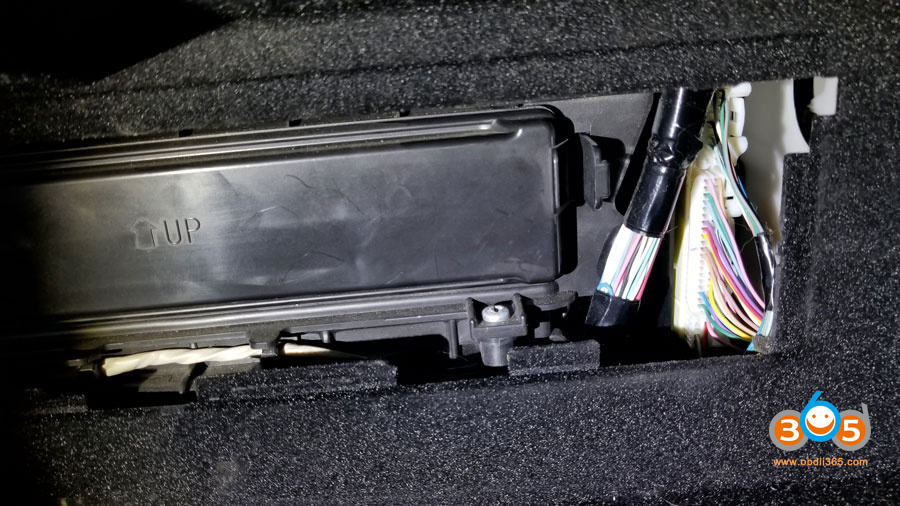
2010 RX350 AC Amp Connector F50 Location
AC Boost Circuit
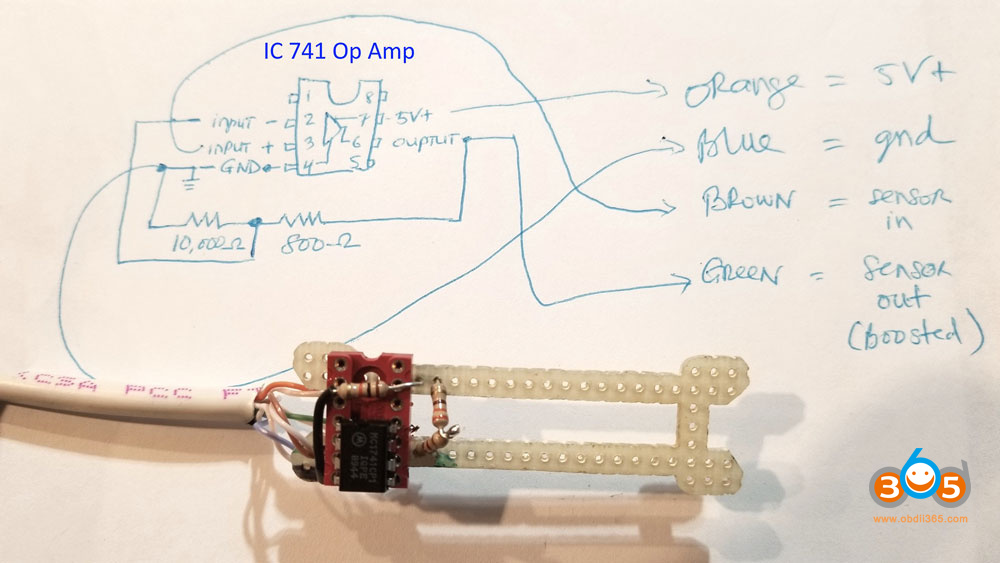
AC Flow Sensor Booster 2
AC Flow Sensor Booster 3
AC Amplifier F50 Connector 3
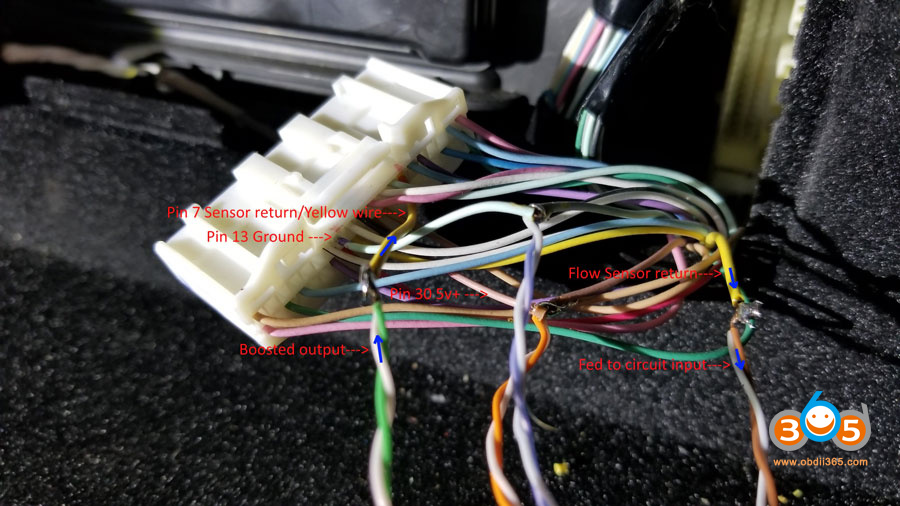
AC Amplifier F50 Connector Wiring
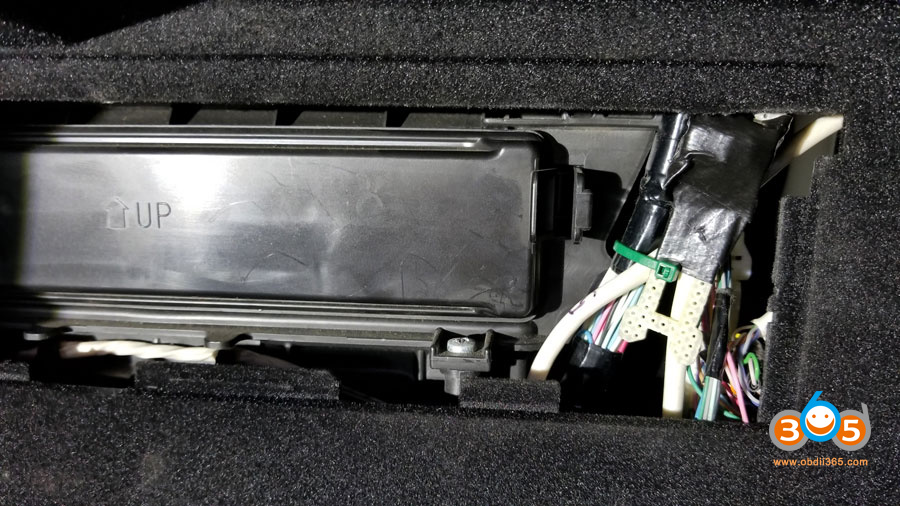
AC Amplifier F50 Connector Booster Installed
Credit to members from Lexus forum.


