This article is on how to update your BMW Inpa USB K+Dcan cable with enhanced firmware which improves communication speed and guards against corrupt ECU flashes!
The items to use:
Besides one of the workable USB K+CAN cables listed later, you will need the following items:
- Arduino Uno (R3, doesn’t matter) or other model Arduino – $3.65
- Dupont or Arduino jumper wires (male to female) – $1.33 for 40
- 2.54mm breakout pins (6 pins total) – $1.13
- Soldering iron/solder (if flashing a generic USB cable with switch that has empty ISP pinouts)
The software to download first:
you will need two programs and the newest firmware file to flash the required software to the Arduino and cable.
Software:
ARDUINO IDE: https://www.arduino.cc/en/main/software
AVRDUDESS: http://blog.zakkemble.net/avrdudess-a-gui-for-avrdude/
Firmware:
Newest Ediabaslib Binary cable Firmware:
https://github.com/uholeschak/ediabaslib/releases
Credits to Ulrich Holeschak who developed this firmware and documented
the procedure for use with his open source Ediabaslib.
Enhanced firmware advantages:
- Can flash the following BMW ECUs without corruption:
M3/M5/M6 DME (MSS6X)
E6x M5/M6 SMG (GDSMG3)
E9x GM Auto (GM1912)
- And more…
Faster CAN communication (block size 0 and no separation time).
Allows configuration of CAN mode all the time, not only after power on.
Allows configuration of the CAN parameters (block size and separation time)
Correctly displays the ignition status (only available for K-line mode).
Contains a bootstrap loader that allows firmware update without opening the device.
Reduced power consumption due to use of sleep mode.
Workable cables:
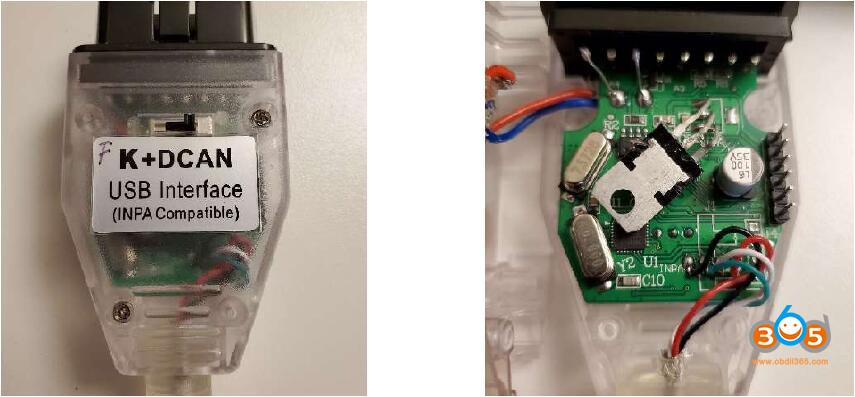
We tested 2 kinds of Inpa K+CAN cable based on ATMega162 board can be flashed with this updated firmware, we are not responsible for any other cables that are not listed below.
- ONESTOP Cable with ISP header: No soldering required


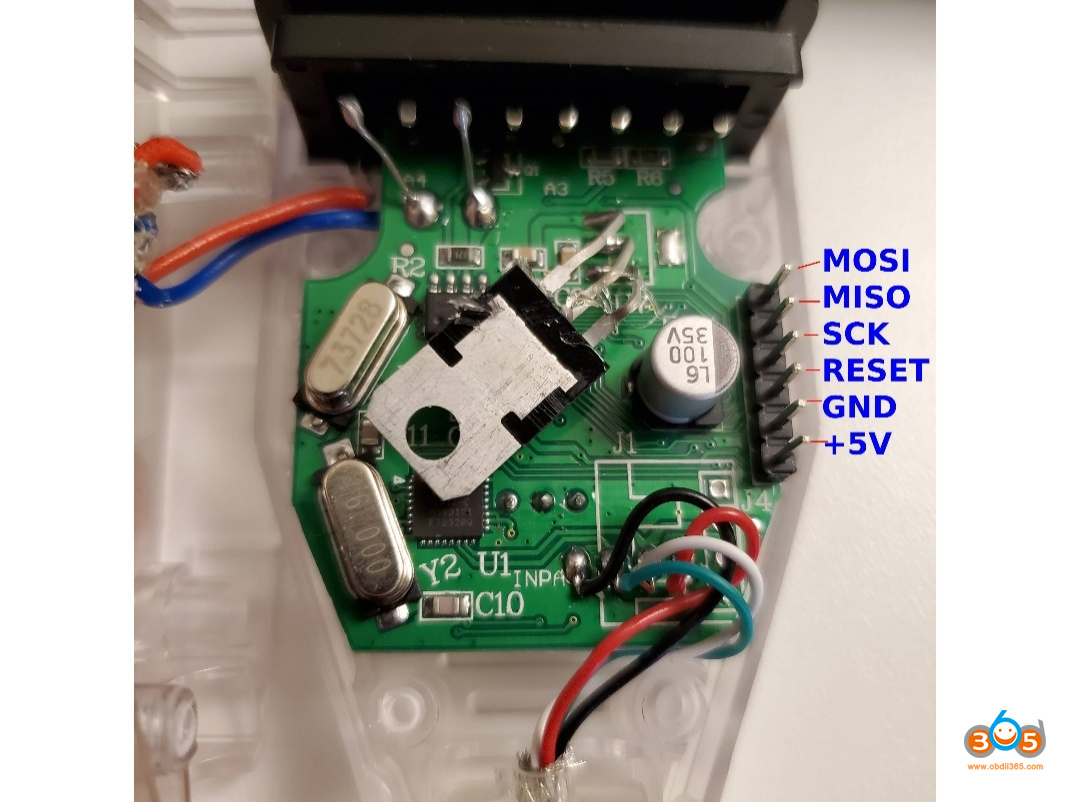
- Generic AtMega162 based USB INPA cable with switch and ISP headers on circuit board: Soldering of header pins required
Before ordering INPA USB cable, Verify with the seller that the cable does have the ISP pin
header.
Look at the images below, the circuit board with pin header that we have already soldered on. The stock cable will not include the male pin headers, but rather empty holes which will allow you to solder on your own pins.
How to install the software for Inpa K+CAN cable?
STEP 1: Install software programs and download latest firmware
After downloading the files listed earlier in this document, install all of them using the default options.
Notes:
Arduino IDE:
When the Arduino IDE asks if you want to install any drivers from ADAfruit industries, select yes
or OK. It will prompt multiple times, but continue to agree to the driver installations.
AVRDUDESS:
Allow AVRDudess to put an icon on your desktop
Binary firmware:
Extract file with your favorite .zip archive extracting utility and save it to a folder on your
desktop.
Configuring the Arduino
STEP 2: Connect the Arduino to PC using supplied USB cable
- After installing the software above, plug in your Arduino to the computer using the supplied USB cable.
Windows will detect and install the driver for the device.

Good to know:
if it does not and it shows that windows has failed to install a driver, download and
install the driver from the following link (CH341 based Arduino boards):
https://github.com/himalayanelixir/Arduino_USB_Drivers/tree/master/Windows
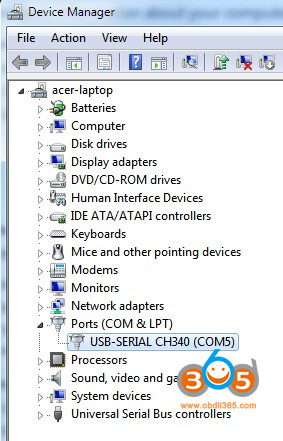
- Verify the com port of the Arduino:
- Open up windows device manager and expand the ports tree to view the Arduino com
port designation (COM5). Make note of this for the next step.
STEP 3: Flash Arduino as programmer
- Run the Arduino IDE application and click OK to any prompts that show (java/firewall).
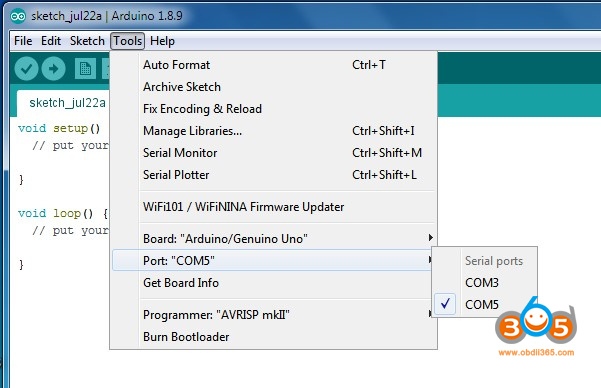
- Click the TOOLS menu > BOARD > and select the Arduino board you have (be it Arduino Uno,
mega, etc).
- Click the TOOLS menu > PORT > and select the COM port you made note of in the previous step (In this example its COM5).
Next, click on the FILE menu > Examples > 11.ArduinoISP >ArduinoISP
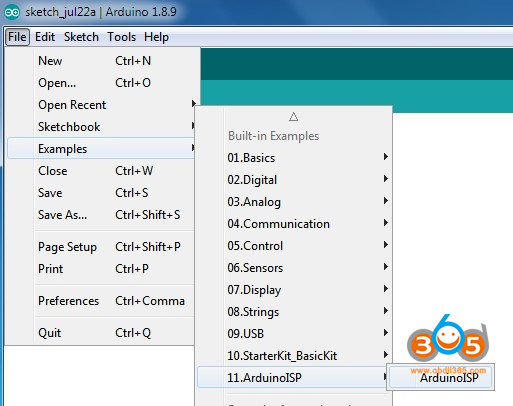
It will open up a new IDE window containing the code which we will upload to the Arduino.
Finally, Click the Arrow button (next to the checkmark circle) highlighted (in white) in the image below.
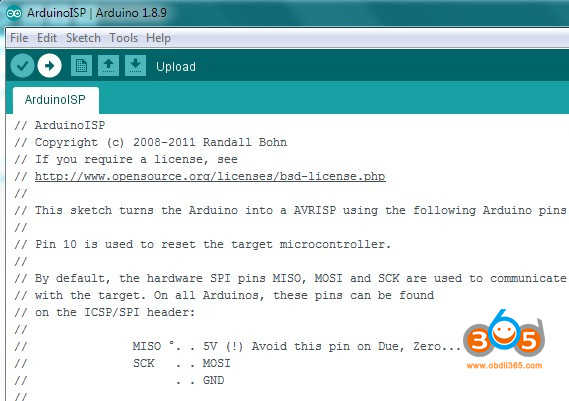
Clicking the Upload button will then begin to compile the sketch, and when done will tell you it is “Done uploading”.
You may now close the Arduino IDE. The Arduino is now an Atmel programmer!
Connecting the Arduino to The Inpa K+Can Cable ISP Pin Header
Connect Arduino to USB cable using jumper cables
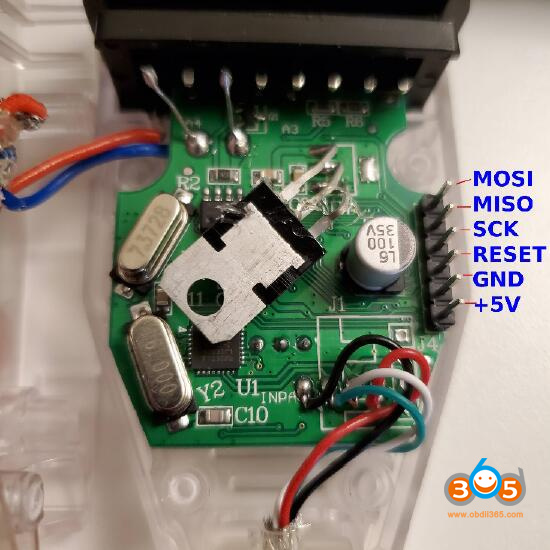
For this step you will reference the images in this document and table below to see the correct pinout designations for the type of cable you are trying to flash. It’s imperative you connect the correct pins on the Arduino to the correct pins on the cable you are trying to flash. Failure to do so will prevent the flash from completing successfully. Bear in mind it makes no difference the color of the wires, as long as the pin number on the Arduino matches the Pin designation on the ISP header on the USB cable you are trying to flash.
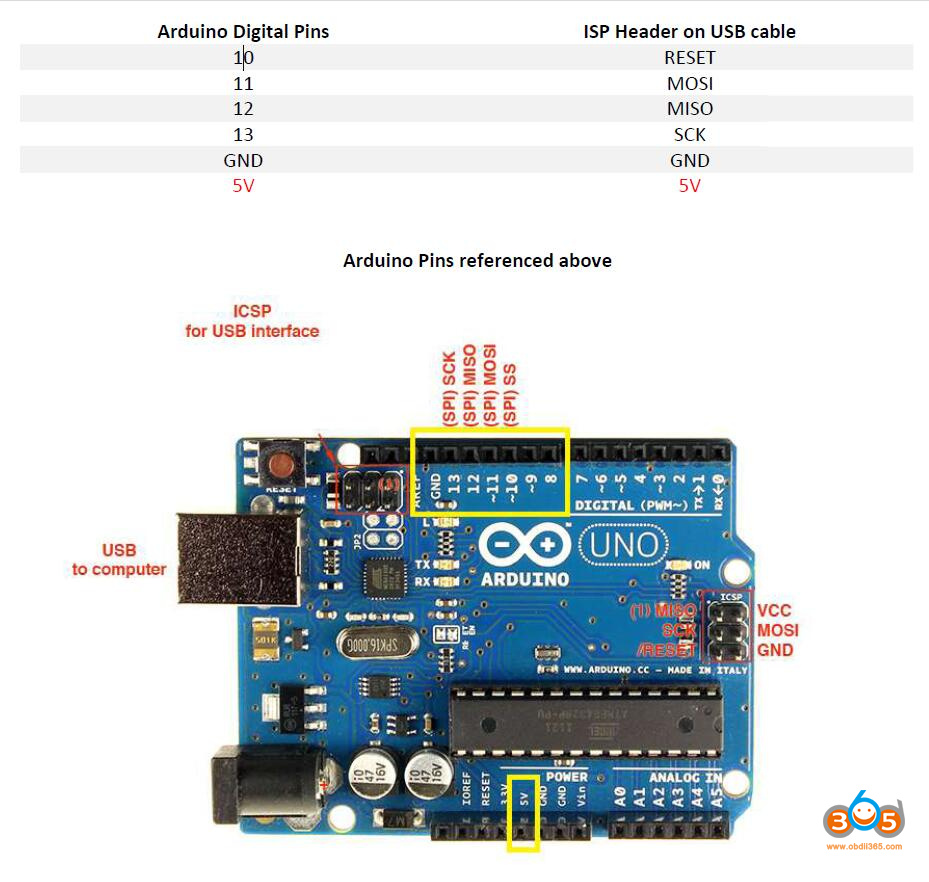
One stop electronics cable
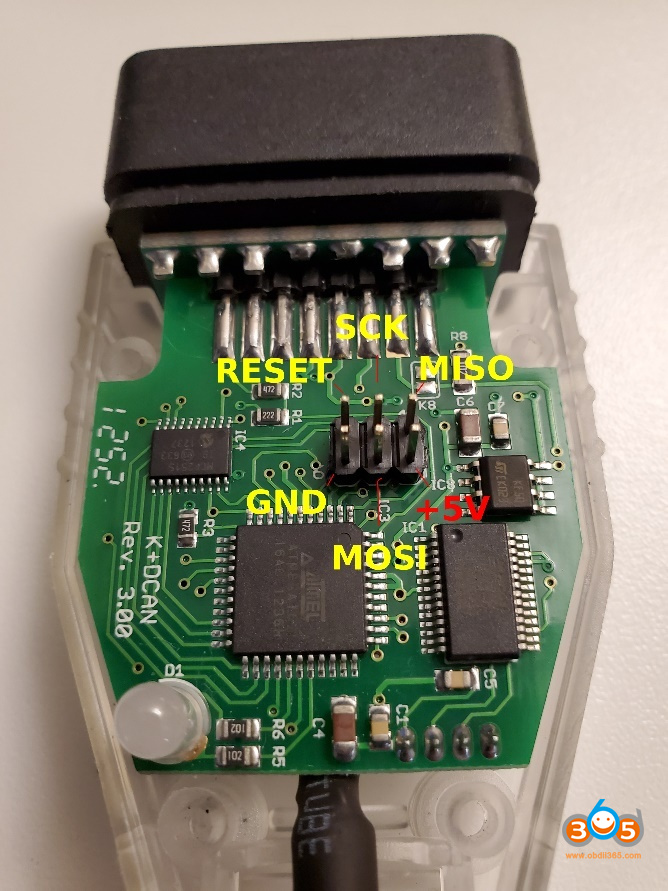
Generic cable with Switch and ISP Breakout
STEP 5: Flash cable with enhanced firmware
Verify:
- The Arduino and USB cable are correctly connected together via jumper cables
- The Arduino is connected to the computer by USB cable
*Optional: Plug the USB cable into the computer to supply it with power (it isn’t necessary to
install any drivers for it).
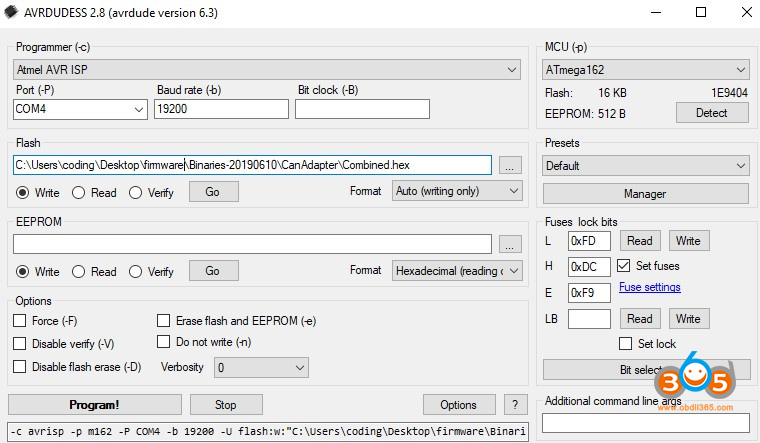
Once the above has been verified, run the AVRDUDESS application and configure the options exactly as
shown below:
Programmer (-c): Atmel AVR ISP
Port (-P): COM PORT YOU NOTED ABOVE (COM 5 in this example)
Baud rate (-b): 19200
Bit clock (-B): blank
Presets: Default
Options: Uncheck all (none selected)
Fuses lock bits:
L : 0xFD
H : 0xDC
E : 0xF9
Set Fuses: CHECKED
LB: BLANK
Once the AVRDUDESS options have been set:
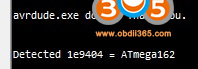
- Click the detect button at the top right corner to verify the Arduino can communicate with the
USB Cable microcontroller. If everything is connected properly, it should detect and specify the
chip in the terminal window and populate the MCU (-p) options with the correct
microcontroller.
If AVRDUDESS cannot detect the correct chip, verify the Arduino to ISP header connections and
double check soldering points.
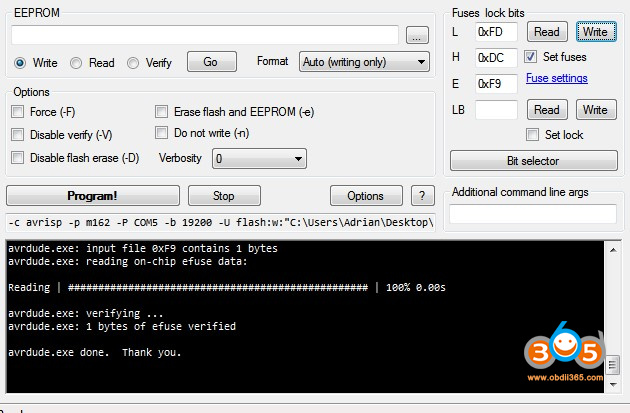
- Next, set the cable fuses by clicking the WRITE button directly under the ‘Fuses Lock Bits’
heading. This will write the three fuses we specified earlier to the cable. AVRDUDESS will also
display a terminal message verifying the fuses as shown below.
- Next, under the FLASH section of AVRDUDESS, click the ‘…’ next to the empty space to browse
and select the ‘Combined.hex’ firmware file located in the CanAdapter folder from the archive
you extracted from the latest binary file located at
https://github.com/uholeschak/ediabaslib/releases
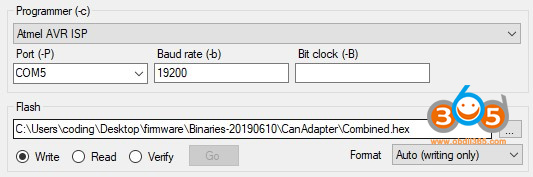
- Verify that the Write radio button is selected, and Auto (writing only) is selected from the
Format drop down selection.
- Click ‘Go’ to begin the flashing process.
At the end of the flash, the LED may light up on the USB cable.
That’s all.
Your Inpa K+CAN Cable is new upgraded with enhanced firmware.
Original resource: https://cartechnology.co.uk/showthread.php?tid=86203