BMW INPA Windows XP installation guide… Here you go…The inpa ediabas software provided and the procedures proposed are intended for personal, educational and experimental use.
Note: this how-to guide here especially for Windows XP users only
For users with Windows Vista, Win 7 (32/64bit), Win 8, Win10, please go to
BMW INPA Download & Install on Windows XP Vista Win7 Win8 Win10
bmw inpa / ediabas interface: INPA K+DCAN usb cable
The version 2016 cable is great, designed with the FT232RQ chip and a switch to turn LEFT is for 7 pin or RIGHT for 8 pin (8 pin for K-LINE communication (old DCAN cables cannot do it) for BMW from 1998 to 2008)

k+dcan cable software: INPA 5.0.2
Running system: Windows xp
k+dcan usb interface software installation:
Step 1: Delete ALL versions of INPA-ADS from your computer or remane all INPA-ADS folders.
For example: remane INPA into “_INPA”, EDIABAS into “_EDIABAS” and so on.
Step 2: Open folder Step_1\ in the root of the CD-disk comes with the inpa cable
Copy folder EC-APPS onto disk С:\
Step 3: Run file Step_1\NFS\Entpackt\disk1\SETUP.EXE
While installing, choose User Mode
Further choose in opening windows:
- Parametrieren einer neuen Konfiguration ohne Daten
- 2. OBD
- Kein API-TRACE
- Kein IFH-TRACE
- Komfort (.IPO)
! RE-BOOT YOUR Computer !
Step 4: Run file Step_2\INSTALL\Instprog.exe
- Choose ENGLISH, press Continue, then press Continue again
- While choosing the HDD disk for initial setup
DO NOT change the location C:\.
INPA installation must be on drive С:\ ONLY !
- Choose configuration BMW Group Rectification programs UK, press Continue.
- Activate all spare boxes with : EDIABAS 6.4.3 – UPDATE, INPA 5.0.1 – UPDATE,
NCS Expert 3.0.8 – Complete
- Press Continue.
Step 5: Run file Step_3\INSTALL\Instprog.exe
- Choose ENGLISH, press Continue, then Continue again
- While choosing the HDD disk for initial setup.
DO NOT change the location C:\.
INPA installation must be on drive С:\ ONLY !
- Choose configuration BMW Group Rectification programs UK, press Continue.
- Activate all spare boxes with: INPA 5.0.1 – UPDATE, NCS Expert 3.0.8 – UPDATE
- Press Continue.
Step 6: Find the file С:\EC-APPS\INPA\CFGDAT\ named inpa.ini
and replace it with the file inpa.ini that is in the root directory of CD-disk given.
Step 7: Plug the Adapter into spare USB-port and install drivers manually from the folder Driver_D_CAN_USB using Driver Wizard of your Windows XP-Service Pack-2
Step 8: Use following pictures for help.
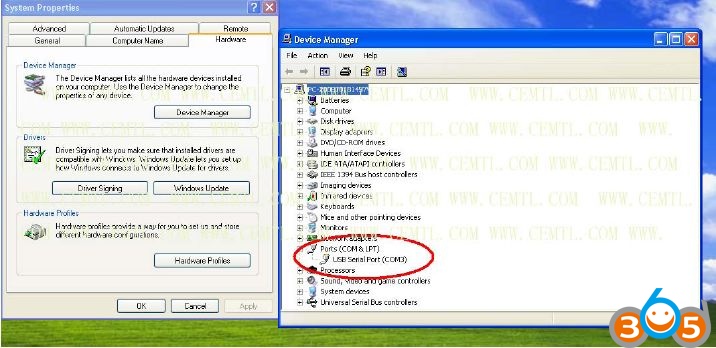
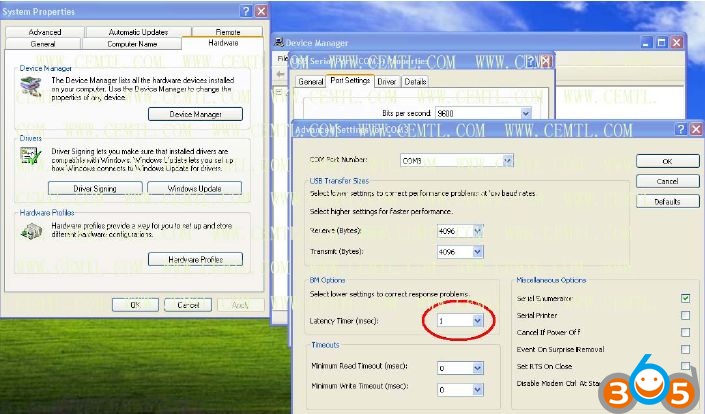
Step 9: In Advanced field change number of COM-port to the value from 2 to 4.
Also change the value of Latency Timer from 16 to 1. Remember the number of the COM-port choosen !
Step 10: In the file EDIABAS.INI “Interface = STD:OBD” must be chosen
(That is default parameter after installing from CD-disk given. Check the parameter if you use another version of INPA !)
Step 11: In the file C:\Windows\OBD.INI put the number of USB-COM-port to the value that you remembered in the step_3
Step 12: Run from CD-disk a file Driver_D_CAN_USB\OBDSetup.exe
Step 13: RE-BOOT your Computer !
Step 14: Use the following order of using K+DCAN USB cable adapter:
– Plug the Adapter into spare USB-port
– Plug the Adapter into OBD-II connector of BMW
– Turn the Ignition into ON position
– Rune the soft INPA with file С:\EC-APPS\INPA\BIN\inpaload.exe
– Choose the model of BMW and type of modul you want to see
– Close the soft and disconnect the Adapter from USB-port each time you change the car connected
N.B.:
K+dcan adapter is already configured to work with BMW both K-line and CAN-bus.
Modes of configuration file D-CAN.exe, that is on the CD-disk given in the folder
_D_CAN_USB as follows:
BMW INPA Cable Configuration:
For configuration interface:
Connect USB cable
Run D-CAN.EXE and setup CAN BUS mode.
LED should OFF
Don’t use USB Extender cable, directly connect interface to computer.